
I’d originally planned to make a wrap jacket as part of my Threads wardrobe plan, but changed my mind, and decided to make a couple of sleeveless tunics instead, figuring that I’d get much more use out of them in a summer wardrobe.
I used the same Christie Jonson pattern as the one I used for my reversible tank top; the only difference is that I lengthened the pattern to turn it into a dress (or tunic). Here’s one version, with the vee neck worn to the front:

When this pattern is worn backside-to-front, you can see that the armholes are cut in a bit more; it’s a slightly more athletic look worn this way, as you can see here:

This was a very easy alteration to make; I just continued the lines down the side seams, making room for my hips. The fit is very nice, and, like the tank itself, the dress was quick and easy to sew.
I like wearing this print in a sleeveless tunic much more than I do in the dress I previously made. The “less” of the tunic minimizes the “more” of the wild print, making the overall effect less overwhelming.
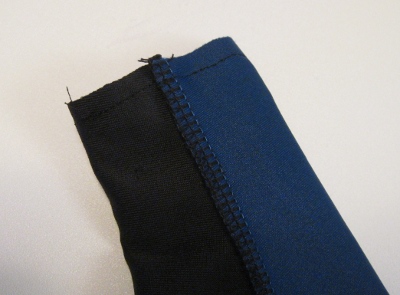
I’d originally intended to make both of these reversible, but that didn’t work out well. The two fabrics I used for the solid version — one black, one blue — did not have compatible stretch. The black side has what I’d consider to be typical spandex stretch — kind of loose, and equal in all four directions. The blue side (which you can’t see in this post) has a slightly stiffer hand, not quite as much stretch crosswise, and a fair bit less stretch lengthwise, than the black.
Here’s the side with the vee neck:

Because the two fabrics would not lie compatibly, I ended up hacking off the skirt on the blue — the stiffer — side, which gave me a perfectly nice tunic, if not the versatile reversible dress for which I was hoping. Turning the reverse into a bodice lining saved the garment, but not the reversibility. Here’s the way it looks with the round-necked “back” worn to the front:

Each garment can still be worn two ways — with the vee neck in front, or the rounded neckline in front — but not by switching off the external and internal fabrics. It’s two-way versatile, rather than four-way, now.
I didn’t even try to make the print reversible, but the light mesh I used for the lining turned out to have a worrisome tendency to roll toward the main fabric, even though I’d edgestitched carefully all around. I added an elastic band at the bottom of the lining to keep it in place, rather like the ones used for shelf bras.
Honestly, I knew better than to try to use two incompatible fabrics in a reversible garment. The blue I ended up discarding was chosen because the color really was perfect for my wardrobe plan. Color, however, is not the only consideration. I knew, even when I bought it, that the variation in stretch was likely to be a problem. (And yet I forged ahead!) Let this be a lesson to all and sundry!
Related:
Christine Jonson Princess Dress 1117
Christine Jonson BaseWear One Top 622


 I made the black ones exactly according to the pattern, and they are true leggings: they fit like slightly loose tights. I wanted the medium blue ones to be less narrow, so I cut them about 1.75 inches wider on each side (legs only), thinking that they would be closer to pants-width than to leggings-width.


