Vogue 7997: “Muslin” Version

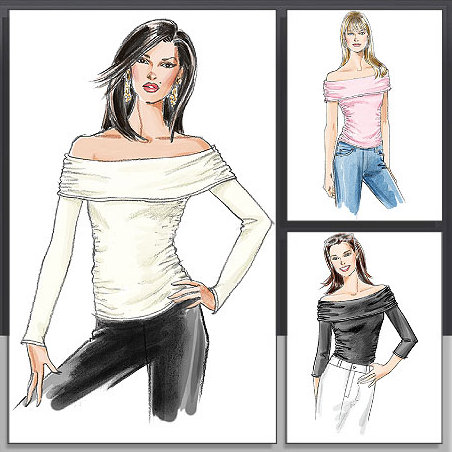
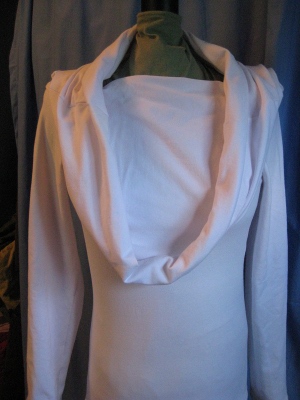
It’s an off-the-shoulder tee (essentially), sleeveless, with 3/4ths sleeves, or with long sleeves:

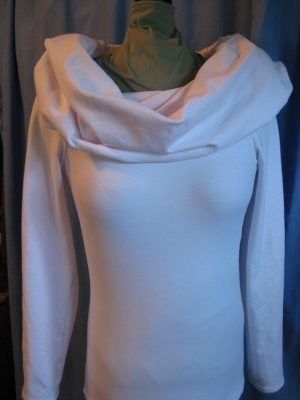
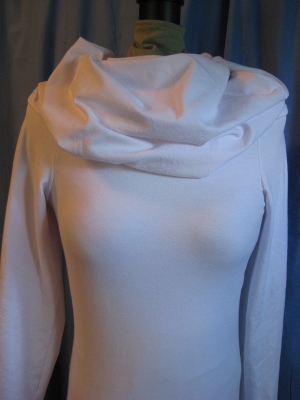
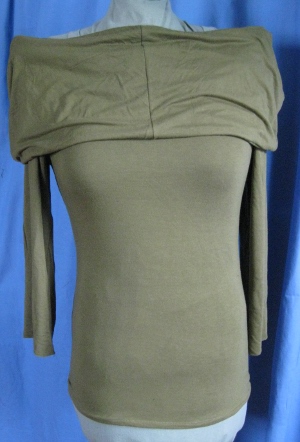
This one turned out to be a genuine muslin.  I’m never going to finish it!  Even so, I’m very, very happy with it:

Yeah, my collar’s completely different.  That’s because the Vogue collar isn’t wide enough to gather at the sides as shown in the pattern.  Or at least it didn’t work at all in my rayon/spandex knit.  It just lay there, limpishly, looking kind of cheap.  If you really want the look of the collar on the pattern envelope, I’d recommend cutting it at least 50% deeper so that there’s something to gather, and some substance to the thing.

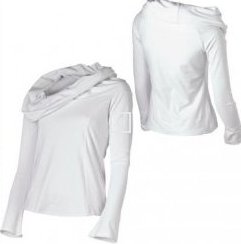
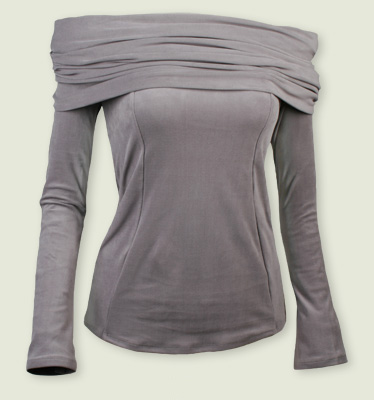
However, I said I’m happy!  Here’s why:  Ever since I first saw Countourwear‘s hoodie, I’ve wanted it.  Making this pattern was the first step toward recreating this:

The point of the exaggerated hood is versatility.  It can be a hood; it can be a cowl worn backwards or forwards; it can be an over-sized, off-the-shoulder “cuff”; it can rest around the neck like a loopy, over-sized turtleneck.  All things to all women!

But I wanted it to fit me just the way I preferred, and that meant making it myself.  (Not to mention that it’s no longer available at Countourwear.) Wrong!  A new version is available; it’s just impossible to find anything on their website.  Not to mention that you don’t get even the slightest hint of how versatile this top is from anything on the current website.  Here’s the hoodie available now (I can’t link directly to their current page, thanks to their really dumb web design):

The princess seams are a really, really nice touch that the original didn’t have.  Mine doesn’t have them either, but that’s OK; it’s exactly what I wanted.  I made my “muslin” version with three-quarters length sleeves:

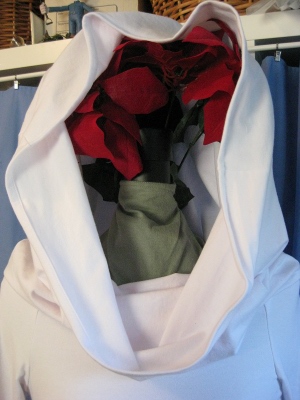
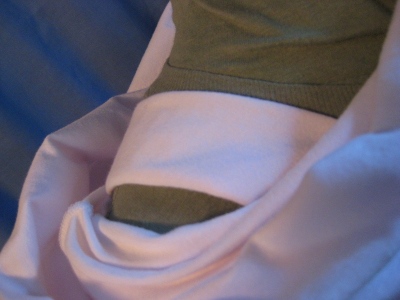
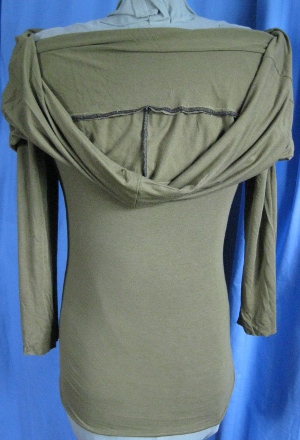
When the Vogue collar on my muslin flopped, I drafted the collar I really wanted — it’s just an extended version of the old one. Really extended — it’s 16 inches longer.  I just grafted on the extension for this practice run; that’s the ugly serged seam you can see in each picture.  When I added the new cowl, I sewed it onto the shirt opposite to Vogue’s instructions.  Attaching the collar right side to right side means that the finished seams show when I’m wearing this as a hoodie.  Here’s the hood, in the draped configuration, in back:

The collar piecing is ugly — that’s why I’ll never finish it — but later in the week I’ll be making the real top.  Size-wise, I cut a 10 everywhere but the bust, where I enlarged it to a 12.  This quasi-FBA works well for me with the right knit.  I did use thin twill tape to stabilize the back of the neck from shoulder seam to shoulder seam to keep it from stretching; the fit there was nice, and I wanted to keep it that way.

Vogue calls for elastic in the side seams as well as the collar, to make the top look gathered, but I wanted to control the look each time I wear it, and liked the top extra long, so I skipped that step.

Related —  Vogue 7997: The Real Thing

Posted in Tops | Leave a comment

We Wear Clothes Oneself: Japanese Pattern Book

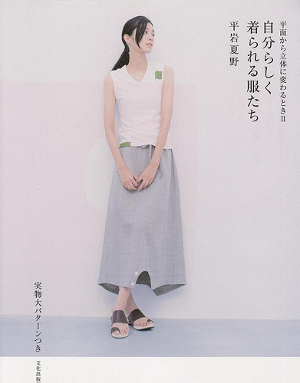
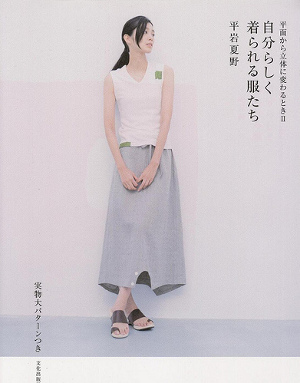
I fell in love with this book at Kinokuniya in New York last summer:

Google translates the title as “we wear clothes oneself“, with the subtitle “when you change from a three dimensional plane“.  (No wonder I loved it!)  To be accurate, what I fell in love with was the skirt on the cover, which has functional cut-outs on the hem that allow it to be worn a multitude of ways:  With the cut-outs in front; to the sides; buttoned together to form pant legs; buttoned to form pleats at the hem.  Whoo, baby, this is my kind of fun!  Which is not to say that there isn’t a lot of other interesting stuff in the book.  There is!

Here’s the list of garments from Amazon Japan (as translated by Google):

a – scarf two yen (I think this name must refer to the shape of a yen coin: it’s a clever scarf made of two circles sewn together to form an “s”shape)
b – to be worn with a light bolero top and bottom of the cloth accents (a light bolero jacket that can be worn two ways, making two different necklines)
c – semi + c flared dirndl (a faux wrap skirt made in two different fabrics)
d – ribashiburuberuto  with pocket (a cute, decorative hip band with a hidden pocket)
e – double skirt (a tube skirt that can be pulled inside out to make several different looks)
f –  best open-back + stall (a scarf that can also be worn as a vest-like topper)
g -furenchisuribuburausu pleated shoulder (simple blouse with a fluttery, pleated sleeve and two neckline variations)
h –  bolero towel (a short bolero-style jacket – maybe possibly made from a Japanese towel?)
i – skirt + pants (my favorite, and the one on the cover)
j – best long scarf (a scarf with two armholes, and a pleat formed by a snap in back)
k – 1 of the marks sheet wrap skirt (a nicely-shaped wrapped skirt with mitered corners on the hem)
l – cloth accents – spiral corsage (OK, this is the only thing I ‘m not impressed with – it looks like a spiral of cloth with ragged edges stuck onto a blouse.  I can’t find the directions for it, either, but I’m thinking that’s no loss)

There’s also an item b1, which is a choker with a fabric “medallion”; the instructions are hidden on page 57 in the back.  And speaking of hidden, if you remove the beautiful dust jacket, there’s another  nice garment shot underneath.

This is one of those Japanese sewing books that have no English instructions.  All the patterns are included on paper sheets in the back of the book.  You fold out the sheets, find the garment you intend to make and trace the pattern pieces.  The saving grace for those of us who don’t read Japanese is that the instructions are beautifully illustrated.  This isn’t a book for a novice sewist, but assembling the garments here should be no problem at all for someone with a bit of experience — or a ton of patience!

We Wear Clothes Oneself was written by Natsuno Hiraiwa (that’s the Japanese form of the name; the surname is Natsuno); the ISBN is  978-4-579-11236-4.  You can order it using the ISBN through Kinokuniya in the USA, or see it on amazon.co.jp, where it can also be ordered.  These books are exceptionally beautiful.  The photos are printed on heavy, glossy paper, and they are a pleasure both to see and to handle.  Not to mention that the aesthetic is deliciously different, even if you never sew a thing and only feast your eyes!

Posted in Books/Magazines, Skirts | Leave a comment

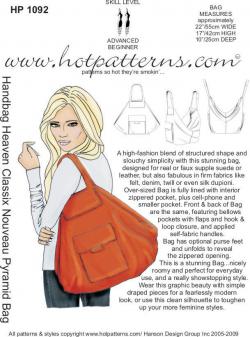
Hot Patterns 1092: Nouveau Pyramid

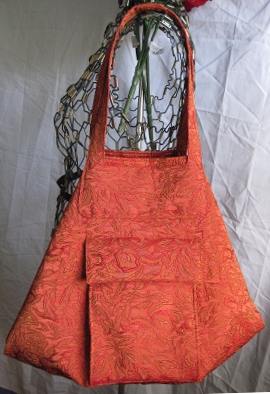
It’s the really, really big bag:

First, the good news:  This really is a fun bag, in the sense that it’s got a lot of style and dash.  I love it, and, although it’s not really appropriate for everyday use, it’s just perfect for certain circumstances.  More on that later.

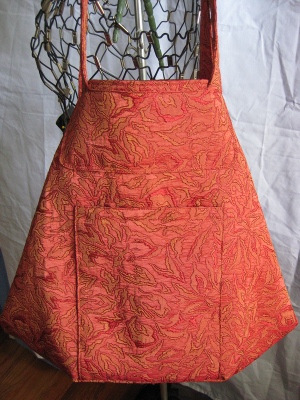
The bad news:  The instructions are, well,  really terrible.  More on that later, too.  In the meantime, here’s how mine turned out.  I reduced the size — see below — and this shot gives you an idea of how it fits on me — or rather, on the me-sized Miss Bedelia:

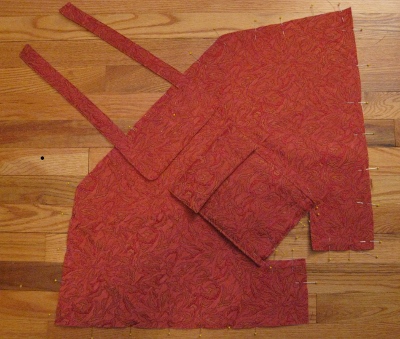
The shape of the main pattern pieces is pretty cool.  See the “wings” off to the sides?  You can see that the hidden part of the bag is as large as what you see when it’s assembled.  You can really see the “wings” when you lay the pattern out.  I thought of this as my “sting ray” bag:

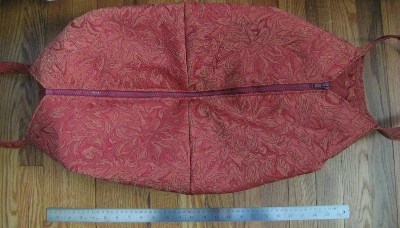
Other reviewers have commented that this bag is HUGE — and it is.  I took the pattern to my local copy shop, and had them reduce it to 80% of it’s original size.  (Cost:  $4.00 US — bringing the price of the pattern to close to $20.00.)  It’s still a big bag, but now it’s day bag, not suitcase-size.  Here’s the finished bag, lying open, with a 24-inch-plus ruler next to it:

If you decide to reduce the size, keep a couple of things in mind.  First, you can’t use 5/8th of an inch seam allowances, because they’ve been down-scaled, too. The new allowance works out to something a little over 1 cm; I settled for 1 cm, which worked fine, EXCEPT for the facing pieces, which meet at an angle.  Too late I realized that I should have re-drafted those pieces, so I have four neat little pleats in the facings to take up the (relatively minor) slack.  If I make it again, I’ll fix that.

I used a quarter-inch seam on the handles.  That gave me straps just about the size of the originals.  The narrow seam was a huge plus, as it simplified turning and minimized trimming.

Secondly, you’ll need a 22 inch zipper instead of a 26 inch zipper.  Do yourself a favor and get a separating zipper.  Do yourself an even greater favor, and get one that opens from both ends.  (I didn’t, and I’m sorry.  With a bag this formless, it’s a pain having to open the whole zipper to get to the far side.)

Thirdly, if you shrink the pattern, you’ll have to enlarge the handle pieces.  At 80%, they wouldn’t go over my shoulder, and the width of the handles where they attach to the bag was too narrow.

I added 3 1/2 inches to the lower panel, and added 2 1/2 inches to the length of the straps.  (Next time I’ll add more; the straps  overlap at the top, and the slight extra padding is a nice feature.  Mine don’t have enough of that.)

I customized my bag in a number of ways.

  • Because I like to clip things into bags, especially deep ones, I added a couple of lightweight hooks and some D-rings inside the bag.
  • I thought the Hot Patterns “small pockets” were wrong for every piece of equipment I own, so I re-configured them, and I suspect most people will get more use out of them if they design their own.
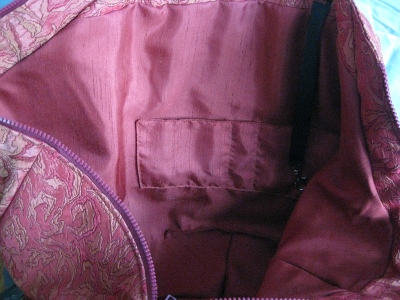
  • There’s an inside zipper pocket, which I enlarged to fit my Sony e-reader.
  • There’s a cargo pocket on both sides of the bag (HP calls it a “bellows” pocket), but I left out the bellows and the closing flap on the back side.  I like to have an open pocket for a notebook, the mail, whatever:

  • There’s a small tab on the cargo pocket flap, which I left off.
  • HP has you use hook and loop fasteners to close the flap; I used purse magnets instead, one on each side, and I’m really happy with the way they work.
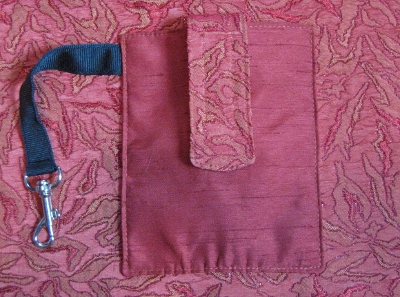
  • Inside this front cargo pocket, I made a hidden phone pocket with a hook and loop strap, and added a key hook:

  • I gently gathered the bottom of the phone pocket, instead of pleating it
  • I interfaced and lined all the pockets; the extra support makes them easier to use, and I hate having raw edges inside my pockets

I used a square of plastic mesh to give shape to the bottom; the bag was too formless and flat without it, and having the extra stabilization helps when wrangling it. (HP recommends heavy-duty interfacing.) Because the “pyramid”  is formed by the sides of the bag, which fold in between the front and the back, the shape shifts around.  Stabilizing the base helps the bag to look a bit more symmetrical.

The stabilization was important for a critical reason:  This isn’t a bag you can just reach into.  In order to keep it shut, you have to keep the straps together; slipping one strap off your shoulder leaves you with a massive amount of fabric falling off your body. In addition, the bag is open on both ends (each end of the zipper), so, at all times, you have to be aware of the possibility of small things falling out.

Because the zipper runs crosswise from front to back, the bag needs support when you open it; because it’s so big, arms as short as mine have trouble providing that support.  If I’m going to open this bag, it has to be on my lap or a table.  It’s kind of a gaping cavern when the zipper is open:

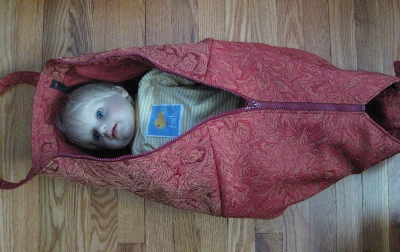
Even reduced to 80%, it’s still big enough to hold a six-month-old baby, should you decide you need an extra baby nest.  (I don’t know what’s up with the color.  I should learn how to take proper photos — but it’s not happening this month.)

So what’s not to love?  The instructions (and too much of the pattern) are kind of an inexcusable mess.  Here’s the list:

  • The sloppy drafting.  What’s up with this?

Yeah, those are the (narrow) straps.  No, I didn’t cut this; this is how the pattern piece is printed.  Which line am I supposed to follow?  Which line matches the other side of the (symmetrical) pattern piece?  Who knows?  Plan to re-draw this.  Call me crazy, but this is something a proof-reader should  have caught, even on a bad day.

  • Know how to make a “bellows” pocket?  I hope so, because you’re not going to get any help here
  • Several people wondered why they had so much trouble putting the zipper in.  Here’s a clue:  there is virtually no information explaining how to do it, and what’s there is confusing as all get-out.  Did HP even test this pattern with anyone who didn’t already understand how to make it up?
  • Illustrations in the instructions are inadequate or misleading
  • The top strip for the zipper pocket is larger than the pocket itself, which means they don’t match, and also, not coincidentally, that the notches on both pieces don’t match up.  Huh?  This is basic stuff, guys.
  • HP says to cut “one pair” of the zipper opening pattern piece.  This is wrong; you  need two pair, one pair for each side of the zipper.
  • Speaking of notches, would it kill HP to use them?  Would it kill HP to identify grainlines so that they’re actually noticeable?  Would it kill HP to name the edges of the pattern pieces for a bag like this, which has an odd geometry?  I think not.

The pattern’s labeled “advanced beginner” but I think anyone could make this bag if the instructions were, well, instructive.  That’s too bad, because the Nouveau Pyramid really is a pretty cool bag; it’s too bad that the pain factor is higher than necessary.

If I make it again (and I might), I’ll seriously consider adding some way to fasten the handles together at the bag top.  Oversized button(s) maybe?  This bag would be easier to manage if the top edges connected.

Because it’s so ungainly, I’ll only be using it as a city bag — I’ll take it with me in fair weather when I need to carry a light sweater or wrap, which can easily hide in the cavernous mid-section.  That means going to museums, etc., where I won’t be shopping or running errands and won’t need frequent access to the bag.  It’s just too unwieldy to take anywhere I’d actually have to dip into it frequently.  In the end, this bag is kind of high maintenance —  rather like the instructions you follow to make it.

Posted in Bags | 2 Comments

A Sewing Weekend

I’m looking forward to an upcoming sewing event — it will be the first time in a long time that I’ve gathered with a group of sewists I haven’t met.

Because I’m awful at keeping people straight, I’m reading all the blogs I can find that are written by those who have signed up.  It’s really exciting to see how varied the attendees are, in every way.  All kinds of sewing styles, abilities, and interests are represented — it’s going to be a fun couple of days!  Here’s the list of blogs I’ve captured, below, in no particular order.  Have I missed anyone?

anaminiac

Lindsay T Sews

Sweet Notions

Adventures in Couture

Sewing by the Seat of my Pants

When Ladies Dressed

Dressed to a “Tee”

Happy Sewing, Happy Knitting

Diary of a Sewing Fanatic

Curtain to Coats (Deepika’s blog; made invitation-only on 4/9/2010)

Miss Celie’s Pants

The Slapdash Sewist

Knit-Knac

Another Creation

Vacuuming the Lawn

FabriCate & Mira

Nancy K Sews

sewl sista #1

Capitol Sew and Sew

Couturesmith

Red’s Threads

The Mahogany Stylist

Mia’s Sewing Room

DD’s World

Sew Tawdry

La Cubanita Cose

Update — two blogs I didn’t catch earlier:

Shiela Crochetz Threadz & Knitz

Sew A Beginner

By the way, a note to Blogger bloggers:  Do you realize that you may be missing out on comments because of your settings?  If you don’t allow name/URL comments, and/or anonymous comments, people who don’t have (or who don’t want) Google IDs or Blogger IDs can’t contribute to your blog, or praise your work!  I often want to leave comments, but can’t because of the settings you’ve chosen.

Since many of you also don’t include any contact information, I can’t even let you know that I wanted to comment, but couldn’t.

By the way, a safe way to write an email address for contact purposes is to put it in your profile and write it out:  sewist [at] sewingblog [dot] com.  That makes it difficult  for spammers to collect your email in an automated fashion for their nefarious purposes.

Related:  A couple of geographically-related Noile posts — Organization, 1798 Style and Early Olfas and, also, Embellishments

Posted in Fun | 6 Comments

Quick Belt

When I made Vogue 1088 recently, I wasn’t very happy with the belt I used in the photos.  It was one I picked up for next to nothing because it was the easiest way to buy a buckle to play with.  It’s some kind of vinyl, with a pearly sheen.  (Maybe it’s supposed to look metallic?)  Here it is on the dress:

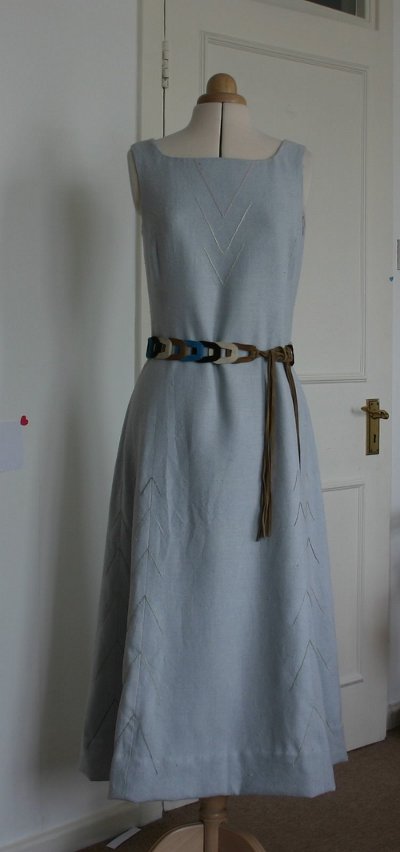
The metal buckle was all wrong (and so was the vinyl), but I kind of liked this style of belt with this dress, though, so I combined some faux linen and a rectangular plastic buckle I got at M&J, and came up with this:

(Whoops –normally that button would be, well, actually buttoned.  My bad.)

It couldn’t have been easier:  I cut the fabric to the length and width I wanted, angling one end (and adding a seam allowance, of course); chose a light interfacing with some body; stitched it all together, leaving one end open; edgestitched; closed the straight end, wrapped it around the buckle’s center bar; stitched the end down, and that was it.

I really like it on the dress, and I love the shape of this buckle, but I wish it were, say, enameled wood or even just a better quality plastic.  It’ll do for now, though, and the belt is just as comfortable to wear as the dress is.

Posted in Accessories | Leave a comment

Embellishments

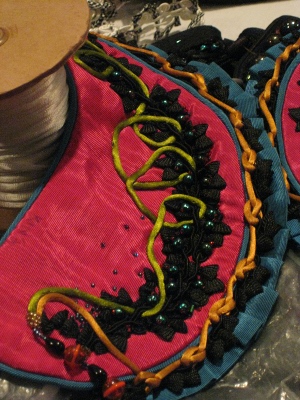
I’ll be taking a sewing workshop soon, and picked up the supplies the other day.  We’ll be doing embellishment, which is about as foreign to me as sewing gets; I’m more a technical/engineering type.  Or, at least, I’m in no way about the glam!  But I’m really looking forward to the class as a way to explore something I’d otherwise never touch.

Here’s what we were instructed to bring:

  • Seed beads:  I got the tiniest black ones (in the envelopes to the right), but also containers of slightly larger beads in gold/brown/black tones and in green tones (the tubes on the upper left)
  • Braid (chain-stitched) trims: I choose ivory, black, and a less loopy one in camel
  • Rattail cord in green, copper, taupe, off-white (and black, not shown) I think we only  needed one color, but I thought I’d like to be able to choose once I’m working, especially since my colors are more “basic” than “flash”
  • Bugle beads (cylindrical beads) (package in the lower right corner)
  • Piece of background fabric (not shown; mine’s off-white dupioni silk)
  • Felt for backing (not shown; mine’s black)

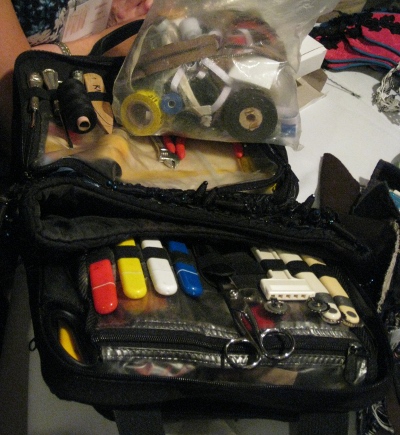
We’ve also been instructed to bring our scissors, thread, pins (normal sewing supplies), no. 10 beading needles, and a pointed sacking needle, none of which I photographed because they’re just part of my basic tool kit.

I can’t see myself wearing garments decorated with these lovely things, but I can imagine that this kind of decorative art might be  pretty cool for cushions, bags, album covers, tops of boxes, on cards (on paper or on stiffened fabric), or even as a (removable) decorative brooch for a flamboyant evening.  Will I be able to find my inner artist?  We’ll know soon  .  .  .

Posted in Fun | Leave a comment

Thrift Store Rescue: Jacket Repair

Sometime back in 2008, I saw this jacket at a thrift shop, and fell in love with it.  Why?  Because it’s weird, that’s why.  It’s a kooky variation on what used to be a classic Columbia winter jacket.  This one is made of the same clear nylon jade/purple/black colors, and has the typical color-patching, but it’s a pullover, and the cut is much trimmer than a typical Columbia-type jacket.

It also has zippers all over the place:  under that snap placket; at the center front (the fit’s so trim that you’d need to unzip to run); under each arm; and up one side.

The problem was that much of the hem had pulled out, and the nylon lining, naturally, had begun to disintegrate.  Not so badly that it couldn’t be fixed, though.  I was pretty sure that, among the very few non-sparkly woven trims at JoAnn, I remembered one with jewel tones not unlike those in this jacket:

Not only were the colors compatible, but the pattern seemed just about perfect, too.  Here it is sewn in  place on the coat:

In the few spots where the lining had unraveled especially badly, the trim was just wide enough to bridge the gap.  I sewed it in place with tiny, nearly invisible stitches, since I didn’t want stitching lines on the front.

The new trim not only solved the problem, but made the inside just as full of crisp, sporty pizazz as the exterior:

You’d never know that the frazzled lining had almost turned this jacket into a discard.  Now it’s my favorite early fall, late spring coat.

Posted in Jackets, Tips | Leave a comment

TSA-Friendly Belt

Ah, TSA.  How you’ve changed our lives.  How difficult you’ve made it to travel in normal, human, clothing.  For an upcoming trip, I am wearing a t-shirt tunic and leggings on the plane because that will get me through screening more expeditiously than anything else, and because, after surviving the horror that is the modern airport, I want to feel comfortable once I’m in that tin tube.

I’d rather be wearing pjs, but, hey, this is the closest I can get.  In a concession to not looking as if I’d just dressed for breakfast, I’ll be wearing a belt.  Not an interesting belt, and, heaven knows, not a belt with any metal — enemy of TSA — in it.  I’ll be wearing this belt:

It’s elastic, 1 1/2 inches wide, with what is called a “ladder buckle” connecting the ends.  Here are the components:

I sewed heavy-duty hook-and-loop tape, as wide as the elastic, to each end of the belt, making sure to leave a lot of room for adjustment.  Once actually on board I don’t want to end up bifurcated by a too-tight elastic band around my waist, so being able to readjust the size without depending on the elastic alone was a must.

It doesn’t bother me to wear the flat buckle in the back, so I can wear the belt as it is above on Miss Bedelia, or turned around so that it looks like a contrast waistband, or a plain elastic cincher.

You can buy ladder buckles at most (if not all) EMS stores (they’re behind the counter, ask to see the delrin or nylon buckles), at REI, and at  sporting goods/adventure stores that sell webbing.  They’re often on a rack by luggage or camping gear.

Posted in Accessories, Tips | 2 Comments

Vogue 8657, Judi Dench, and Me

OK,  so there are several problems here.  The first is what I have in common with Judi Dench.  Dame Dench has been quoted as having said (either to Charlie Rose or to USA Today, I can’t seem to track it down):

In my mind’s eye I’m 6 feet tall and slender as a willow, and I’ll go through life like that.

She is five feet, one and three-quarters inches tall  (156.8 cm).  I am five two and a half (158.8 cm).   Not unlike Judi Dench, in my mind’s eye I am six feet tall (182.9 cm) and a Swedish Amazon.  This is possibly why I am drawn to patterns like Vogue 8657:

See those proportions?  I’m not sure any  human possesses them, but I can tell you, definitively, that no person of approximately five feet, two inches does.  But if I were six feet tall  .  .  .

And then there’s the question of my bust.  It is not the bust of my youth; without going into too much detail, it is not even the bust of my early 30s.  I am still essentially proportionate — for a person five-two, not for an Amazon — but my bust has become round.  And bigger.  Substantially bigger.

Don’t get me wrong. I like my body.  It’s the only one I have, and, really, I’m fine with it.  But I’m a little confused about how to clothe it if I’m not wearing t-shirts and jeans.

One recent pattern works pretty well, and I think I know why.  It has a long skirt with a lot of character, and what you see are proportions created by the dress.  It’s an illusion; it’s not me.  (But I like it!)  Vogue 8657 achieves no such sleight.

So here it is:

It turned out fine, in the sense that it fits.  I cut a 10 everywhere but the bust, but it’s borderline too large, and if I keep losing weight, I’ll have to move down to an 8.  I cut a 12 in the bust, and moved the darts down a little less than an inch because   .  .    well, you know why.

You probably noticed right away that the proportions of this top have nothing to do with the elongated version in the illustration.  My top — the real one — is squarish, not an attractive rectangle.  Not the attractive rectangle that would lengthen the appearance of the body, for example.

And there’s another problem:  When you put a largish, roundish bust into a squarish, boxy-ish blouse, you get  .  .  .  formidable.  In this case, not formidable as in “awesome”, but as in “bust like the superstructure of a battleship”.  On a dinghy-sized rowboat.
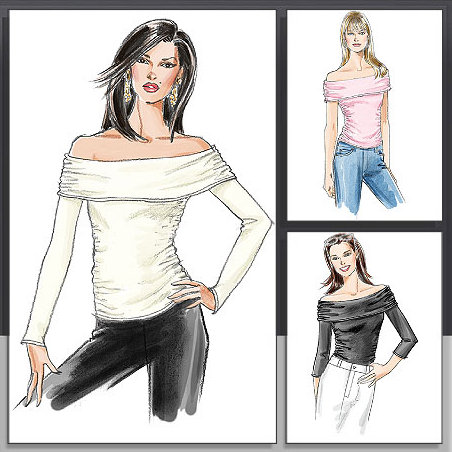
So the envelope fails to illustrate the top accurately in terms of aspect ratio.  And that lovely drape sketched so nicely by Vogue?  Well, the back of the envelope fails to mention that this top is entirely self-lined.  I used an extremely light — almost handkerchief light — rayon blend.  Doubled, it folds; it does not drape.  If you want flow, you’ll need to use the thinnest silk you can find, or chiffon.  Or change the construction completely by not lining it.

Other issues:  There’s a long buttonhole, through which the sash threads.  For some reason, it’s placed above the waist.  Which means, in my case, that my waist would get completely lost, and my bust would have a tie more-or-less right under it.  Not good.  I lowered it.

Also, if you use the spot Vogue appear to have marked for placing the single snap, you won’t be able to use the sash, because the snap is right smack in the way.  What’s up with that?

The buttonhole foot on my main machine won’t make a buttonhole as long as this one needs to be.  (I could do it with the machine, guiding it manually, but I’m not that brave reckless.)  This blouse wasn’t “bound-buttonhole-worthy”, so I just faced the two buttonholes (one in the main fabric, one in the lining), basted them together once the blouse was done, and then edgestitched all around.

I might wear it, but I don’t know if I’ll ever be resigned to how I look in it.  It’s back to the drawing board for me, style-wise.  Grrr.

Posted in Tops | 4 Comments

Cuffing Travel/Trekking Pants

Every pair of travel/trekking pants I own has a bunch of features I really like, but no one pair has every feature I like.  The particular pair I’m posting about here are nearly perfect, but the legs are much wider than I prefer for most uses.  Most such pants have tabs, snaps, or some other way to cinch in the legs, but this pair doesn’t.  That’s because they have side seam zippers so that the legs can be easily pulled over hiking boots:

That’s a great feature, but on me, these legs are waaaaay too wide.  I needed some way to rein in that yardage!

There was no way to find fabric that was exactly like the one used for the pants,  so I bought a half-dozen buttons and sewed two small loops made of 1/8th-of-an-inch elastic.  I sewed two buttons just close enough to hold the elastic loop next to the pant leg.  Then I sewed a third button on each leg far enough away so that stretching the elastic to reach it made the pant leg as small as I wanted.

Then I sewed each elastic loop permanently around the far left button.  The free loop slips over the button to the near right when the pants are being worn with the legs wide, keeping the elastic from flopping.  The far button is used to hold the loop in place when the pant legs are cinched:

A pleat is automatically formed under the buttons, and voilà, no more balloon-legs.  Or ticks crawling above your socks.  Much better.

Posted in Pants, Tips | 2 Comments