Vogue 8497 Revisted

A comment by bananaoil on my patternreview.com review of this pattern got me thinking, so I went back to this shirt, whose failings I’ve discussed in detail in a previous post. This top turned out to be very boxy, and the neck band was, well, dreadful. So I changed a few things. Here’s the Marcy Tilton/Vogue photo:

First of all, I folded the neck band in half, toward the inside of the shirt, encasing the top edge of the neck opening, and hand-stitched it in place. That gave a much cleaner look, and also brought the size of the finished edge much closer to the look on the Vogue envelope.

Then I tackled the boxy look. I couldn’t very well lengthen the top, but I could tackle the sides. Beginning below the bust (which fit just right), I tapered from nothing to a whopping one and one-half inches at the hem. That’s a grand total of six inches taken off the width at the bottom! But it improved the looks quite a bit, as you can see:

I still think that this top could use another inch and a half to two inches in length, but I was surprised to discover that my altered top looks much more proportionate when it’s paired with Marcy’s wonderful skirt (Vogue 8499):

The neckline still isn’t right, though, and (not surprisingly). I haven’t decided whether it’s going to be worthwhile to alter the length, and work out a neat finish for the raw edges in a new top. I think I’ll move on in the meantime, and give the whole thing more thought before committing any more time to making another one. I do love that curved line; I wish Vogue had done a more careful job of scaling this pattern.

Update 4/20/08 – Marcy Tilton wrote a generous and helpful response to my review of this pattern on Pattern Review: you can read it in the comments by clicking here.

Posted in Tops | Leave a comment

Vogue 8497 – Marcy Tilton Curved-Seam Tee

Vogue, oh Vogue, why for hast thou forsaken us? I spent this evening stitching up one of Marcy Tilton’s new shirts, and it’s a wadder. The wadder isn’t my shirt, though, it’s the pattern itself.

The first clue came when I opened the envelope: inexplicably, there were two full sets of parts for the view I was making (B). The second set wasn’t connected to any other pattern pieces; it was just folded up all by itself, almost as if someone had stuck it in later. Maybe to correct something on the original pattern? I don’t know for sure, because I haven’t compared the two sets. I’m just speculating, but I have my reasons.

I’m thinking someone should have stuck in a corrected pattern because there were a couple of problems with View B. First of all, the left front and back side pieces did not match at the hem; I had to trim one piece to make the hem even. I’d cut this pattern very, very carefully — you have to, because of the way the shirt’s made — so I was quite sure this wasn’t my mistake. Sure enough, the paper pattern was the source of the problem.

Second, there’s that neck band. The instructions say “Pin wrong side of neck band to right side of garment neck seam allowance, placing neck band seam off center back, as desired, and long edge along seam line, stretching neck band to fit.” Well, OK, that’s exactly what I did, assuming a 5/8ths inch seam. The front and back of this shirt each have one panel that is attached just like this, though, and in those cases, the overlap was one inch. So maybe the term “seam allowance” is up for interpretation here.

However, I think we can all agree that the result (below) is pretty awful. And my neckband is twice the width of the one shown in Vogue’s photo — and looks at least twice as terrible. Whoever made up this shirt for Vogue didn’t use the pattern I used.

Thirdly, check out the aspect ratio of my shirt compared to the photo on the pattern envelope, or on Marcy’s site. (Aspect ratio is the relationship of height to width.) On the envelope, this shirt is substantially longer than it is wide; the proportions are really attractive. My shirt, in contrast, is almost as wide as it is long. It’s boxy and it’s ugly. Someone didn’t do his or her design homework before this pattern was published. That’s not very nice. If I wanted boxy, I’d shop at KMart.

So this pattern’s fatally flawed. I’m bummed.

Before I knew all this, though, when I first got this pattern home and read it, my heart fell a little bit. I’m no fan of raggedy chic, and that lovely curved edge on the front of the shirt turns out to have an unfinished edge. Oh, the horror! That neck band, which looks so sleek in the photo, is also just a strip of fabric with raw edges. Little did I know that the raw edges were the only things that would turn out well on this project.

I could have finished the overlapped edges (with something like a narrow bias tape facing, you know, something along those lines), but I bit the bullet. I also did something else I almost never do: I followed the directions. I wanted this project to be fast, and to work the first time — because this was supposed to be my dry run for May’s PR Mini-Wardrobe Contest.

Well, it worked all right, in the sense that I made it up in one evening, followed the directions, and ended up with a shirt. Unfortunately, it stinks. Bah. Now I’ve got to find something else for May. I’m thinking it won’t be Vogue — this is the second Vogue pattern in three days with a serious error (or two). (See Vogue 8499.) Is everyone asleep over there at Vogue? Is anybody doing any editing? Any checking at all?

Related: Vogue 8497 Revisited

Posted in Tops | 5 Comments

Vogue 8499 – Marcy Tilton Skirt

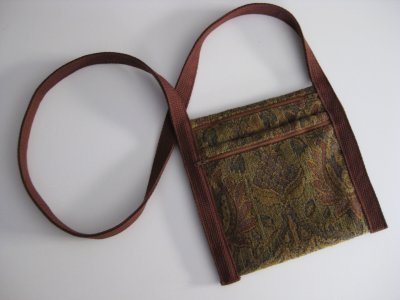
See this fabric? It’s ugly. What was I thinking? I don’t even remember when I bought it, but I must have thought it was a stupendous deal, because I bought a lot. Not only is it boring, but it’s also a little on the heavy side – perfect for a really durable tablecloth or something like that. No matter how hard I try, though, I don’t see a beige-flecked-with-brown tablecloth in my future. So this stuff got nominated for the muslin of Marcy Tilton’s new skirt pattern.

It wasn’t a great choice, but it did the trick. I’m ramping up for PR’s Mini-Wardrobe contest and wanted to make sure this skirt would work for me before the first cuts begin on May 1. I’m happy to report that it does, but here are a few notes for anyone else who’s tempted by this pattern. My fabric’s a slightly loosely-woven blend, maybe of linen and rayon. It has drape, which is nice for this skirt, but weight, which is less nice. Vogue’s fabric recommendations (stretch woven, double knits and silk dupioni) are just about right: you want a fairly light fabric, but also something with a bit of substance, so that you don’t lose that nifty shape at the hem.

The front of the skirt is sewn in three panels: you hem each one before assembly, and attach deep pockets to each side panel before putting the front pieces together. The pockets are anchored at the top with zippers, and would-be sewists be warned: one side of the zipper tape shows, in all its bare glory, at the top of the pocket. That might not matter, depending on your fabric or color choices, but it became an issue for me. I found an interesting Mahogany Brown zipper that picked up the flecks in my fabric, and coordinated with the shirt I’m making to go with this skirt. I wasn’t sure I’d like the effect, but I figured that adding a band of color to the skirt couldn’t hurt, given the essential blandness of the fabric.

The zipper tape is an issue to keep in mind; however, there is a an actual error that everyone who uses this pattern should be aware of. The notions list on the pattern envelope calls for “three 7″ zippers”. WRONG! Even for the smallest size skirt, a seven inch zipper will not fit on the pockets: Buy two NINE inch zippers, and, for the third zipper, use whatever size you want to close the skirt. At 10 PM, it was disappointing to discover that my zippers were too short. In my stash, I found two nine-inch Ecru zippers, and quickly realized that they weren’t going to work. In place on my pockets, they looked like lingerie straps gone wrong. Wracking my poor tired brain, I remembered that I had a half yard of an embroidered ribbon tucked away, so I applied that over the exposed zipper tape before setting the pocket into the skirt. I think it was a good save, but boy, am I happy this was only a muslin.

I put the zipper pulls next to the side seams; Vogue’s line drawing puts them toward the center panel. I think I’ll do that next time; they seem to add a little bulk at the sides, which might be less noticeable if relocated. The photo on the envelope is quite deceptive. If you look closely, you can see that the manikins are standing on their toes. This appears to elongate their legs, and makes the skirt look as if it’s much shorter than it is. The back skirt length is given as 34 3/4 inches, well past my ankles. I didn’t check this little detail before making the skirt, and did only my usual 2 inch alteration to shorten it. I think I’ll shorten it another two inches in the next iteration. The waist is semi-fitted with both elastic and a back zipper. I did a placket insertion, because I think they look a lot nicer. The casing for the elastic is cut in one with the skirt, but I trimmed it and used bias tape for the casing because my fabric was fairly bulky, and I wanted the waistband to be a bit sleeker.

Though the design is really interesting, with curved hems, those pockets, and great lines, construction is actually very simple. The trickiest part is forming the bottom of the pockets, which requires mitering the corners, and then edge stitching the bottom edge to the skirt panel.  Vogue’s directions are very clear, though, and even a novice should be able to get through this without too much difficulty. Basting the pocket sides is a must, though, since there is a tricky notch at the bottom of the pocket that must line up properly if the pockets are going to look as they should.  (Ed. 4/12/08 – lower edge of pocket above.)

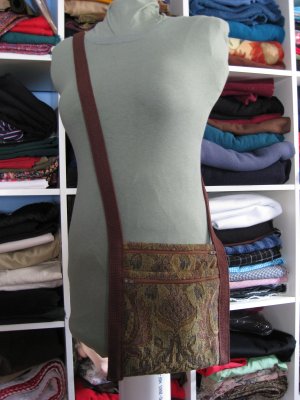
On my dummy, this skirt looks like a particularly unflattering apron from another age. (That’s why you’re seeing it here with a purchased t-shirt, which somehow makes the skirt look more like actual clothing.) On me, it looks much better (partly, maybe, because I’m now somewhat smaller than my dummy.) This skirt begs for a more interesting fabric, or maybe even just the causal crispness of a black stretch cotton. I can’t wait to make it again!

Posted in Skirts | 2 Comments

Apology to Commenters!

Noile.Net’s been having some birthing pains, and, most recently, some update pains. Everyone’s comments got lost in the shuffle, and none were posted until today. They should all be up now, with my responses, so please do check, and I’ll watch closely to see that they don’t get lost in the future. (Some of my responses are out of order, so you may want to scroll down if you asked a question.) My apologies!

Thanks, Trilby, for alerting me to this problem.

Update: Email sent to me until now may have been lost. I can be contacted (it’s been newly tested!) at Noile [@] noile.net. You’ll have to remove the brackets, of course, and put the address into proper email format.

Posted in Fun | Leave a comment

Pattern Review Mini-Wardrobe Contest

Pattern Review has a new contest with a mini-wardrobe theme, scheduled for the month of May. Here are the official rules, taken directly from the site:

This is a contest to create a 4-piece wardrobe in 4 weeks. Those pieces should fit one of the following three frameworks:

1) 2 bottoms and 2 tops – 1 may be a jacket

OR

2) 1 bottom and 3 tops – 1 (no more than one) may be a jacket

OR

3) 1 bottom, 1 dress or jumper, and 2 tops – 1 may be a jacket, and the top or jacket *must* be wearable with the dress or jumper.

Here are more details:

If a jumper is made, it should go with both tops (i.e., function as a bottom).

All pieces must coordinate with each other. A coat may be substituted for a jacket, but also must coordinate well with all the other items in the wardrobe.

And:

Patterns may be new, never sewn before, or TNT. Self-drafted patterns are fine. Patterns may be drafted, tweaked, and muslined before the contest date, but fabric for the pieces entered cannot be cut till the start date of the contest (May 1).

Pretty clear, but what’s TNT? I’ll have to find out. In the meantime, I’m wondering if I can enter this contest using only fabric already in my stash. I really, really don’t want to buy more. Honest.

Related:  My storyboard for the contest

Posted in Fun, Plans | 4 Comments

Ghee’s 721 The Messenger Bag

The best thing about having a dedicated sewing space is that I have immediate access to sewing therapy. Anytime I have a couple of spare hours, it’s no trick at all to zip in and whip up a simple project. This small bag was one of those “I just want to make something tonight” kind of projects.

messpatt.jpg

I picked up this Ghee’s pattern because I’d been toying with the idea of making a small, portable pocket-type bag. The photos on the front of the envelope (above) cinched the deal; the design looked simple and cute, and the strap-and-binding-in-one appealed to me.

The pattern is simplicity in itself — there is one large rectangular piece, and an optional pocket with piecing details. It’s a three-size pattern: small, medium and large. I made the medium which is about 8 1/2 by 9 inches. It has three pockets; two are zippered, and there’s a third one between the two zipper pockets. I added a magnetic catch, as suggested, to the open pocket. I didn’t make the optional outer pocket.

tapbag400.jpg

The directions are beautifully presented, and there are several very helpful tips on the first page, along with directions to make a pieced front for the optional pocket. However, there was trouble right away, at Step 3.

The bag’s meant to be made of pre-quilted fabric. For the basic bag, you cut two rectangles, and then attach zippers across each end. Step 1 and Step 2 describe the placement of the first zipper. In Step 3, you edge-stitch the zipper tape across the front of the fabric. And then you’re left stranded. Step 4 says “repeat this process on the other end of the fabric”. However, there are three “other” ends of the fabric. You don’t want to attach the end of the first piece of fabric to that first zipper; you must attach the second piece to the second edge of the first zipper.

So there really should be a Step 3A: “Repeat Steps 2 and 3, this time attaching the second piece of fabric to the unused section of the zipper tape.”

And a re-written Step 4: “Repeat this process on one unsewn end of either fabric piece 1 or 2, using the second zipper. Then finish applying the zippers by attaching the final, unstitched fabric end to the last, unsewn, side of the second zipper. If you do this successfully, you’ll have connected the two pieces of your bag, end to end, forming a cylinder.”

Ghee’s directions don’t make it at all clear which piece of fabric you’re working with initially, or when you begin working with the second piece. That’s really unforgivable: after all, the only reason you buy a pattern this simple is so that you don’t have to draft the rectangles or work out the order of the construction steps. Fortunately, after this lapse, the directions are better, and the bag goes together quickly.

tapbagmod300.jpg

I made mine from tapestry scraps left over after making my Siberian Parka, with a silky lining material as the wrong side. The heft of the two fabrics was about the same as a pre-quilted fabric. I did have some trouble with my webbing — since the only brown webbing I could find was cotton, and fairly stiff and thick, I didn’t fold it in half, as the instructions suggest. Instead, I bought twice as much, and sandwiched the bag between the layers.

That worked fine, but there was a little too much bulk at the bottom of the bag where I joined the ends of the strap. (If you look closely at my photo you’ll see that I couldn’t get the strap perfectly flush with the bottom of the bag.) Next time, I might try putting that join elsewhere — at the top of the strap, on the underside, maybe.

I was lucky to find coordinating zippers in an unusual color (“London Tan”) and a reddish brown webbing. Finding webbing that isn’t black is sometimes problematic’; Ghee’s offers a trim kit on their website in a variety of colors. The kit includes a sew-on magnetic catch; I’d prefer that to the one I used, which required punching holes in my fabric.


Posted in Accessories | Leave a comment

DIY Cases for Small Electronics

Stores are full of fun, customized cases for small electronics like MP3 players, cameras and cell phones. But your small electronics suddenly seem a lot bulkier once tucked into these cases. I make thin, protective cases out of socks; this keeps my gadgets small and easy to carry.

socks400.jpg

I use the top part of a crew sock for each case. The ribbing pulls the case in at the top, keeping the device in the pocket.

My MP3 player is sturdy, without a vulnerable screen, so its case is just fabric. It’s really small, so I had to cut the top ribbing to make it narrow enough to hold the player in the case. For larger items, the ribbing can be left in place.

sockcase1-400.jpg

My digital camera, though, has a large LCD screen that needs a little more structure to protect it. I bought a microfiber cloth meant for cleaning such screens, and cut two pieces the size of my camera. I split the top of the sock up one side, and sewed three sides of the microfiber to the wrong side of the sock top, forming an inner pocket.

sockcase2-400.jpg

Then I cut two thin plastic sheets from some packaging I had around, and slipped them into the inner pockets. Once the plastic was in place, I closed up the side and bottom seams on the sock case. Voila! I’ve got a hard-sided, but very thin and light case.

The brown case coordinates nicely with my newest digital camera, but I actually prefer to make these cases in loud colors; they’re a lot easier to find in pockets and bags when the colors are screaming for attention.

Posted in Accessories | Leave a comment

Butterick 4790 Vintage Dress

I love bias binding. Yes, it’s nuts, but it’s true; I’ve always loved applying it and finishing off raw edges so neatly. You can see that this pattern’s appeal to me is obvious. And then there’s the construction — so flat! Just wrap around, close one clasp, button the front and off you go. This pattern is one of Butterick’s vintage collection. 1952, here I come!

pat4790.jpg

Well, maybe not quite 1952 — the wacky print I chose is strictly modern, especially since it’s enhanced with my favorite ingredient: spandex. Love that stretch! As for the black trim? What can I say? I was going for drama.

fushnblack300.jpg

The pattern’s great, truly easy-to-sew, and the dress makes up quickly. I loved it from the start, but my spouse didn’t. He pointed out that the neckline wasn’t really becoming on me. He was right. That’s not a neckline that looks good on everyone. It took several months before I decided what to do about it, and my decision was radical. I took the sweetheart neckline from this pattern:

swt6723.jpg

and re-cut the front of my dress.

fuschneck400.jpg

The result’s pretty nice, I think, and much more becoming on me.

I changed three other things as well: Instead of letting the wrap-around tabs meet end-to-end in the middle front, I overlapped them. I used two larger buttons instead of the three suggested.

Since I noticed that the under-sheath (the nearly-hidden front of the dress) tended to ride up when I wore the dress, I sewed the buttons to the bodice, and made buttonholes in both sides of the overlapping tabs on the skirt. This keeps everything in place nicely.

One last note: I made a narrow hem, faced with bias tape. I much prefer this type of hem when the skirt is this full and the fabric has some substance.

(The New Look pattern is 6723.)

Update 18 July 2008:  Vera, a reader from Portugal asked if I could provide more information about the way the dress is constructed.  Here’s the line drawing from the back of the pattern envelope:

The dress is made just like a sheath in front, with a slim, straight skirt.  This slim front skirt wraps around to the back and fastens at the center back waist. It ends up under the back skirt, which wraps over it.

The skirt that is attached to the back isn’t gathered — it’s almost a circle skirt.  This back piece wraps around to the front, over the sheath, and fastens at the center front waist.

I hope this helps, Vera, and I apologize for the delay in responding.  This has turned out to be an event-filled summer here, and I’m way behind on Noile dot Net and about a hundred other things, too.

Posted in Dresses | 15 Comments

A Valance, In the French Style

Just when you think you’ve found the perfect valance, another one comes along:

frval400.jpg

This one’s from France, early 18th century “linen plain weave with silk and wool embroidery in half-cross and cross stitches”. That blue would work very nicely with the walls of my sewing room. It’s actually a bed valance, but just the same . . .

You can see this, and a few other items of interest, in a very small room off a main gallery on the second floor of the Philadelphia Art Museum.

Posted in Fun | Leave a comment

Folkwear 153 – Siberian Parka

parkapat.jpg

I’ve wanted to make this parka for decades. Two years ago, I found a lightweight upholstery tapestry fabric that seemed just right for it. The primary colors are a muted olive green, a dark gold, and a muted rust. I wanted a serious winter pullover, so I also bought rust microfleece for the lining.

parkasketch.gif

Last year, I finally put it together. The essential design is very simple; it’s really just a batch of geometric lines. For my version, I eliminated the yoke seams closest to the center line, partly because my fabric was relatively thick, and partly because of the complications of matching the pattern. I also combined the two pattern pieces for each sleeve, eliminating the lower seam, for the same reasons.

sparkafrnt300.jpg

I made a size small. It was the right choice, since I added an almost-bulky lining. If I make a single-layer version in the future, I’ll make an extra-small. Other reviews I’ve read pointed out that the sizing tends toward the huge; I agree!

sparkaback300.jpg

For cutting I had to lay the fabric flat. Matching the fabric motifs was time-consuming, and adding the lining contributed to making this project much bigger than necessary. There’s nothing complicated about the essential construction, though, and this coat could probably be made up in a couple of hours with a different fabric choice and no lining. Above is the back view, showing the hood, and, below, a detail view of the front where the hood is attached to the yoke.

sparkathroat400.jpg

The pockets are the only real challenge; it’s critical to mark them carefully on the front before you stitch. The instructions call for only one line of stitching, which doesn’t offer much security if you plan to use them vigorously. I didn’t like the look of a double row of stitches, so I took advantage of the slight pile of my material and just sewed over my original line of stitches a second time.

pkastraps300.jpg

I added small hooks and D rings on thin webbing straps inside the pockets; I don’t carry a bag or purse when wearing this parka, and like to secure my belongings when using large pockets.

sparkahood400.jpg

The lines of the hood were a fabulous surprise — the curve around the face is beautiful, and the neckline looks great whether the hood is up or down. (Sorry, no face shot to show that curve, but take a look at the pattern; you’ll see how nicely it works.)

Here’s the back view with the hood up:

sibhoodup300.jpg

My photos make my coat look a little limp; with me inside, it’s got a lot more flair (literally) — much like the Folkwear photo below. This is one of my all-time favorite coats, and I’m really eager to make it again (and again and again!). It’s amazingly easy to wear while running around town, and there’s nothing better for riding the subway in deep

It’s not exactly easy to remove, and, made of my heavy-duty fabric and lining, it can be very warm if you’re spending more than a few minutes indoors.

parkaplaid.jpg

I could see this in melton wool, polarfleece, a corduroy or even a sweatshirt fleece. Folkwear shows it in this plaid; very sophisticated!

Folkwear Patterns can be difficult to find. I own several boxes of them, bought many years ago, but ordered this one from Ursula’s Alcove, and was very pleased with the pleasant help and fast shipping. It’s worth shopping around; some sites charge ridiculously high prices for Folkwear; comparing prices can save you lots.

Posted in Coats/Capes/Wraps | 6 Comments