
The best thing about having a dedicated sewing space is that I have immediate access to sewing therapy. Anytime I have a couple of spare hours, it’s no trick at all to zip in and whip up a simple project. This small bag was one of those “I just want to make something tonight” kind of projects.

I picked up this Ghee’s pattern because I’d been toying with the idea of making a small, portable pocket-type bag. The photos on the front of the envelope (above) cinched the deal; the design looked simple and cute, and the strap-and-binding-in-one appealed to me.
The pattern is simplicity in itself — there is one large rectangular piece, and an optional pocket with piecing details. It’s a three-size pattern: small, medium and large. I made the medium which is about 8 1/2 by 9 inches. It has three pockets; two are zippered, and there’s a third one between the two zipper pockets. I added a magnetic catch, as suggested, to the open pocket. I didn’t make the optional outer pocket.
The directions are beautifully presented, and there are several very helpful tips on the first page, along with directions to make a pieced front for the optional pocket. However, there was trouble right away, at Step 3.
The bag’s meant to be made of pre-quilted fabric. For the basic bag, you cut two rectangles, and then attach zippers across each end. Step 1 and Step 2 describe the placement of the first zipper. In Step 3, you edge-stitch the zipper tape across the front of the fabric. And then you’re left stranded. Step 4 says “repeat this process on the other end of the fabric”. However, there are three “other” ends of the fabric. You don’t want to attach the end of the first piece of fabric to that first zipper; you must attach the second piece to the second edge of the first zipper.
So there really should be a Step 3A: “Repeat Steps 2 and 3, this time attaching the second piece of fabric to the unused section of the zipper tape.”
And a re-written Step 4: “Repeat this process on one unsewn end of either fabric piece 1 or 2, using the second zipper. Then finish applying the zippers by attaching the final, unstitched fabric end to the last, unsewn, side of the second zipper. If you do this successfully, you’ll have connected the two pieces of your bag, end to end, forming a cylinder.”
Ghee’s directions don’t make it at all clear which piece of fabric you’re working with initially, or when you begin working with the second piece. That’s really unforgivable: after all, the only reason you buy a pattern this simple is so that you don’t have to draft the rectangles or work out the order of the construction steps. Fortunately, after this lapse, the directions are better, and the bag goes together quickly.

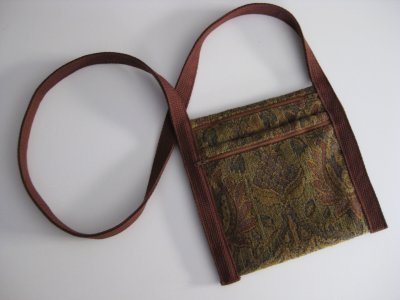
I made mine from tapestry scraps left over after making my Siberian Parka, with a silky lining material as the wrong side. The heft of the two fabrics was about the same as a pre-quilted fabric. I did have some trouble with my webbing — since the only brown webbing I could find was cotton, and fairly stiff and thick, I didn’t fold it in half, as the instructions suggest. Instead, I bought twice as much, and sandwiched the bag between the layers.
That worked fine, but there was a little too much bulk at the bottom of the bag where I joined the ends of the strap. (If you look closely at my photo you’ll see that I couldn’t get the strap perfectly flush with the bottom of the bag.) Next time, I might try putting that join elsewhere — at the top of the strap, on the underside, maybe.
I was lucky to find coordinating zippers in an unusual color (“London Tan”) and a reddish brown webbing. Finding webbing that isn’t black is sometimes problematic’; Ghee’s offers a trim kit on their website in a variety of colors. The kit includes a sew-on magnetic catch; I’d prefer that to the one I used, which required punching holes in my fabric.