Vogue 7862 – Brocade Bag

One of the gifts I received this holiday season was this beautiful brocade fabric, which Mr. Noile’s mother Trilby and I had spied earlier in the year at a favorite shop.

tap-swatch-300

Trilby snuck back later and bought a piece for me. The rich burgundy, gold and rust colors aren’t my usual ones, but I’m planning to make some neutral linens this summer, and this should be a gorgeous accent for them.

Trilby and I share a love of bags, and she had a tote in mind when she gave me the fabric, but somehow it was Vogue 7862 that I thought of when I was deciding what to do with it:

v7862-300

The bag’s design is a bit odd, and I thought it looked a little more like apparel than like a purse. I figured the brocade would enhance that feeling (and it did!). I hadn’t looked at any reviews, so I was surprised when I discovered that the pattern has only three pockets: one in each of the shoulder straps (like the ones in my Keen bag and knock-off: love those!), and a large one in the main body of the bag.

I had assumed that the large front pocket was actually two; there’s a vertical zipper that I’d figured somehow divided the main pocket. I’d also assumed that there was another full-sized pocket across the body of the bag. (Obviously, research wasn’t a big part of this project.)

Standing in an interminable line at JoAnn’s gave me a chance to read the pattern and realize how wrong I was. On the plus side, the wait was long enough that I was also able to figure out how out how I’d alter the pattern to better suit my needs.

tap-frnt-pckts-300

Sandra Betzina claims that this is “the perfect travel purse”, but that’s only true if you don’t mind having everything you own fall out when you open the main zipper. Not my idea of good travel gear.

On the other hand, I really liked the look of that vertical line. To solve this vexing problem, I assembled the front pocket using Betzina’s design, but attached lining pieces to the backside of the front pocket along the zipper edges:

tap-frnt-lining-300

Then I added an extra lining piece behind the combined pieces:

tap-pkt-backing-300

Before I assembled the body of the bag, I added an invisible zipper across the back of the bag. When the front and back were sewn together, this gave me two pockets in the main body: One, with the vertical zipper in front, and one in back, with a horizontal zipper. I made a simple lining for the rear pocket, and attached it by hand to the zipper tape inside the bag.

tap-lg-notebook-mod-300

This hidden rear pocket is a lot more practical, and much easier to use than the designer pocket in front.

If you wanted to add an internal zipper pocket for a wallet, this alteration would let you do that pretty easily — just add it to the back lining before stitching it in place. Getting into an internal, hidden zip pocket from that vertical front zipper would be a bit grueling, but would be easy through this wide opening in the back of the bag.

Invisible zippers and I have a tortured history, but I think I’m finally beginning to get the knack of installing them. I finally figured out that placing the zipper perfectly into the invisible zipper foot right at the start makes all the difference; the foot then automatically rolls the zipper teeth into the correct position for close stitching. (Yeah, I know — I’m a little slow.)

tap-frt-zip-mod-300

The “seam” appearance made by the invisible zippers really is perfect for this bag, and it doesn’t hurt that a print like this one hides a multitude of invisible zipper sins. I especially liked the one I used in the extra main pocket — at a quick glance, you’d never know the pocket is there at all.

Betzina has you interface the straps only to a point just into the hidden pockets. After I constructed the straps, I realized that the fragile threads on the wrong side of my brocade would disintegrate a little bit every time I took my phone or keys out of the unlined pockets. That meant that lining them was essential.

tap-llining-300

I cut two strap pocket lining pieces with one folded edge, stitched up the open side, and inserted them. Take my advice, and do this before you make the straps. Doing it afterward is something of a challenge. (At least I hadn’t edge-stitched before I added the lining — taking that out would have been a nightmare.)

tap-linen-side-200

Because my fabric was a fairly soft and fluid one, I used a heavier-than-usual interfacing. My thinking was that this would make the strap a bit more comfortable to wear by providing some unseen padding, and that worked out well. It did make turning the straps challenging, though, so I used a giant kilt pin (carefully pinned into a seam allowance) to pull the end through. Worked like a charm!

I decided that I didn’t want to take the time to design custom internal pockets for this bag, which is for special occasions rather than everyday use, but that left the problem of how to handle gear that I might want for a day trip into the city, for example. I solved this by attaching small snap hooks inside the main pocket:

tap-snap-zip2-300

And then by adding tiny d-rings to my transferable pockets:

tap-trans-pkt-d-ring-300

This worked out really well, and now I plan to use this trick with all my future “fashion” bags. I’m thinking that I’ll be able to make so many more if the internal pockets travel from one to another so easily — a girl just can’t make too many bags, don’t you think?

Here’s how the transferable pockets look clipped inside the bag (it’s turned inside out so that you can see it better):

tap-trans-pkts-lining-300

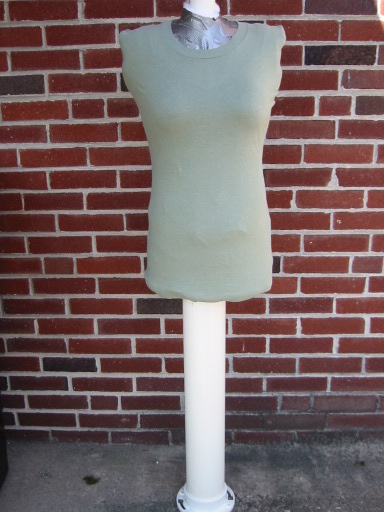
I made the petite version, which has a shorter strap and a slightly smaller body than the regular version, and really appreciated having this option. It fits my body well, and, as I suspected it would, this bag feels more like clothing than like a purse — a quality I’m really enjoying. To give you an idea of size, here it is on my un-draped, petite-dummy-torso:

tap-dum-side-200

This is quite a fun pattern, however, I’ve got to say that there is something particularly nervy about claiming a retail price of $16.95 USD for a pattern that involves only four pieces (three of them perfectly ordinary rectangles), and one small instruction sheet. There’s no real value add here, either, for, although Betzina mentions embellishing the bag (a fun idea), she doesn’t offer any suggestions for how to do it.

The envelope calls for a yard of 60 inch fabric, but I had almost exactly 3/4 of a yard of 56 inch fabric, and was able to fit all the pieces for the petite bag with no problem (but without an inch to spare). This won’t work if you’re cutting a fabric with nap, though; then you’ll need the full yard for the petite size.

Isn’t this the best kind of gift? It’s a present, and an adventure! Thanks, Trilby (and — forgive me — dear Mr. Trilby, too)!

Posted in Bags | 4 Comments

Transferable Pockets for a Bag

Five or six years ago, I made a strip of pockets and used it all the time in my work totes. The idea was to have all my stuff (phone, Palm Pilot, Moleskine, business cards, etc.) in one place for quick grabbing during the morning rush. After I stopped working at an office, I tended to use bags with internal tailored pockets, so this little gadget stayed in a drawer. I’ve resurrected it for a new project, though (more about that later), and decided to post a description here.

Planning was really important here. Before I cut, I laid out everything I thought I’d want to put in the pockets. I’m no longer using the same stuff, but here’s an idea of what I would put in mine now:

tap-trrns-stuff-300

In this picture there’s a comb, a Moleskine datebook, lip balm, a phone, a small flashlight, a pocket wallet, earbuds, and an MP3 player. I also planned a pocket for my camera (in use at the time this picture was taken!) and another small notebook.

My finished strip measures 25 inches by 5 1/2 inches, so I cut two pieces of nylon ripstop that size, plus a small seam allowance, for the main fabric and the lining. I also cut a light interfacing to give the pockets some structure. I wanted an identification holder, so I figured out where it should go on the outside of the pocket strip, and stitched a clear plastic window in place before sewing the pocket strip. Then I assembled the strips right side to right side, with the interfacing against the wrong side of the fabric pieces, and stitched around three sides, leaving an opening on one short side for turning.

trans-pockets-300

Then I turned it right side out, and, placing each item where I wanted it, defined the pockets with pins. Above the identification card I placed three narrow pockets: Lip balm goes in one and I carry a small dental brush in another (thanks to a horrible orthodontist whose talents still affect my teeth). I can’t remember what I kept in the third small slot years ago, but a digital camera battery would fit there nicely now. Here’s what the finished pockets look like, stuffed and folded up:

trn-wrap-300

I like using dark ripstop or a microfiber for sport linings because it’s very lightweight but strong, shows little wear or dirt, washes up nicely and dries quickly. Because it’s a little hard to see inside a purse or bag, though, I color-coded most of the pockets after I’d decided where each one would be.

After figuring out the pocket placement, I opened the strip back out and added bright grosgrain ribbon tabs to the tops of most of the pockets . Then all that was left to do was to sew the vertical lines, and close up the side opening.

You can see the finished tabs easily when the pockets are rolled up:

tran-roll-300

I wasn’t the only one to have this neat idea. Not long after I made mine, a whole bunch of similar organizers turned up all over the place. Small wonder — they’re really useful, fun to make, and are a great gift, too! If you’re more creative than I am, yours could be really beautiful, too: Instead of ripstop, consider using silk, a set of retro prints, or maybe even chiffon and satin for evening.

Posted in Accessories | Leave a comment

Storage Bag for an Inflatable Bed

stor-bag-3001Project three of the new year was a really simple one. An inflatable bed needed a storage sack so that it didn’t get punctured while being hauled around. I used a double faced quilt and made this ungainly thing. It’s especially wonky-looking because the pump is stuffed in on top. In this household, we’ve learned to keep all the bits and pieces together. Makes for a much better experience later.

There are two small buttonholes on each side of the top opening. with a single drawstring through the front of the bag, and another drawstring across the back of the bag. It’s much easier to open and close the bag with the two strings, instead of using a single one. There’s a cord-lock toggle on either side of the opening to keep the strings from disappearing into the casing, and to keep the bag shut neatly.

stor-square-3001 I like a defined bottom on all my bags, since it makes them easier to load gear into, and also easier to store, as they tend to stand upright a bit better. (And they look so much nicer!) It took only a minute to stitch across the corners at the bottom and give the bag some shape.

Seriously bad photo, I’m afraid. I should resolve to do something about my photography skills this year, but I’m hoping to have too much fun sewing instead.

Posted in Bags | Leave a comment

Grab Loops on a Window Shade

The second task of the new year was this somewhat peculiar project. Our laundry room has a window above the washer and dryer, but I’m just too short to reach the shade that covers it. The shade itself is ugly, I’m afraid, but it’s also very different from (and better than) anything I could find to replace it. It’s very heavy vinyl, and completely blocks light. It also works very, very well. And, as I couldn’t help noting when I considered replacing it, it’s already installed. Putting up new shades in the sewing room was a nightmare I’m not eager to experience again.

grab-trim-3001What I needed was some kind of handle. I probably should have crocheted a small ring and strung it from the bottom, but I’m just not up for crocheting right now. Instead, I put up a yellow and blue valance, and found matching colors in grosgrain ribbon for this trim-and-grab-loop solution.

The yellow quarter-inch ribbon is stitched over the blue, one-inch grosgrain. I had a sewing machine foot that I thought would make the job of sewing one to the other easy by letting me thread the narrower ribbon through the foot, but it turned out that the ribbon proportions were wrong. After a few practice scraps, though, I figured out how to feed the ribbons evenly by hand, and got a pretty good result.

I couldn’t find an adhesive that worked on the shade, so I had to figure out how to get the stripe to stay in place. In the end, I ran the ribbon completely around the shade, going through the slot at the bottom where a wooden slat goes to make the shade more sturdy. Underneath the trim, and just above the slat, I carefully cut two buttonhole-like slits, and ran the back of each loop through each one. That way, when I pull on the loops, the pressure is on the slat, not on the shade itself.

The horizontal ribbon strip is just pinned inside the slat’s sleeve. (Don’t tell anyone!) Logistically, it was too difficult to try to stitch it, and I was worried that I might need to tighten it up later. The loops are discreetly hand-stitched closed, since putting the entire shade under the sewing machine wasn’t an option.

Mr. Noile isn’t wild about the look; he says it’s a bit utilitarian, and he’s got a point. Considering the issues, though, I think it’s a good solution for now. And that dreadful fringe? Well, that’s for another day. In the meantime, I’ll just call it vintage, and appreciate its historical value.

Posted in Home | Leave a comment

The New Year, In a Small Way

The family has gone, and the house reassembled, so, obviously, it’s time to start sewing again! Several things were left unfinished after a mad final quarter in 2008 when I was frantically filing and organizing the house. On Friday, I got them done.

First was this small valance for the upstairs bathroom. Neither of us is entirely crazy about having this wonderful print on a wall, exactly, but it does fit the personality of our 1952 bathroom just fine:

redval-300

In keeping with my new-found resolution to use up as much stash as possible, the curtain is lined with a sheet that’s been kicking around, allegedly as ‘muslin’, for a few years. Instead of sewing a rod pocket across both fabrics, I attached the main fabric to the lining with enough of a seam allowance in the lining to allow me to make a pocket for the rod in in the lining alone.

Making the pocket rod a little snug keeps the valance in place (no lining creep in the top), and lets the main fabric fall directly from the rod. Unless a curtain is gathered, I really don’t like the way the rod pockets (and stitching) look when you can see them from the front.. This was a good way to keep the focus on the print, not on the construction.

(Yes, that’s an awful line on the blinds where my hand-cleaning stopped. It turns out that you CAN remove 30 years of accumulated dirt from fragile blinds — you just have to go very slowly, one slat at a time. I’ll be getting back to that one of these days. I got distracted by all the more necessary blinds that were breaking, and thus in dire need of immediate attention, on the other twenty-six windows in the house.)

Posted in Home | Leave a comment

Duct Tape Dummy

Dawn, the prolific sew-ist of the blog Two On, Two Off has just made a duct tape dummy, which reminded me that I’ve been meaning to get this post up forever. It’s from a small website I started a few years ago; I’m now smaller than this dummy, and need to make another. Not that I have the time, of course. One of these days. Sigh.

Using a lot of information posted by a whole bunch of people on the internet, Mr. Noile and I set out to make a duct tape dummy, or dress model, for me. I needed something to use to photograph my projects, but, even more, I have wanted a dummy for years to make fitting my projects easier.

dtdducttape512.jpg

Here’s my materials list:

* A helper! (Don’t try this alone — it may work, but you’ll go crazy and it will take forever)
* Two rolls of wide silver duct tape (bigger women will need more)
* Two plus bags of firm polyester stuffing (bigger women will need more)
* An old t-shirt, or better, an old turtleneck

I prepared for the taping by wearing my usual undergarments, which was a major mistake! I tend to wear athletic bras, which are not about shaping as much as they are about comfort. It was obvious — too late — that the athletic bra helped the duct tape to squish the area in question. The result was a dummy which resembled — frighteningly — my shape without a bra at all. We’ll be doing this again one of these days, this time with a bra with a superstructure like the ones Jane Russell wore!

Over the undergarments, I wore an old, large men’s t-shirt, to which I’d sewn an extra sleeve to cover the v-neck and my throat area. To eliminate bunching, we slit the t-shirt at the center front and back and sides — later we had to slit the sleeve tops, too. Next time, I’ll use a more closely fitting old turtleneck.

The taping itself is pretty straightforward — long tapes around the broad areas, like hips and back, and smaller pieces (some ripped lengthwise to make them skinnier) for areas requiring contour, like the waist and bust. In addition to wearing a more structured bra, next time I think we’ll take a much more detailed approach to the bust area, beginning with a narrow “x” between the breasts, and then building the bust up from the bottom, putting a lot of structure into the lower bust area (kind of like an underwire bra).

I’ve noticed that lots of people don’t take the tape all the way up the neck, but I’m glad I did. It’s been very helpful to have that additional bit of anatomy to work with.

The taping itself didn’t take us long, but now I think I know why — too little time spent on the curves. I think it was about 45 minutes total. I took everyone’s advice and made sure I wasn’t going to be hobbling off to the bathroom during the taping. The thought alone just makes me shiver.

I made a stand for my double, and then slipped the form over the stand, and proceeded to stuff it, starting at the shoulders. I used firm polyester stuffing (a little over two 20 ounce bags — I’m 5 feet 3 inches, and weigh 122 pounds), and it worked just fine. I stuffed from the shoulders down, and had to rearrange the top of the stand to make sure it stayed in place as I worked, but as soon as the shoulder area was padded, that was no longer a problem. I used a dowel to get bits of stuffing into smaller areas (through the armholes, for example) as I was refining the shaping, and making the dummy firmer.

dtdcover512.jpg

I was worried that the stuffing might fall out as I worked, but that really wasn’t an issue — it seems to cling to itself, and the various curves help to retain it, too.

Once I was through stuffing, I checked the measurements, and made a few adjustments. At some point, we’ll re-do this project, but in the meantime, I got my bra-wearing contours back by putting the bra on the dummy, and stuffing it to my contours –a good temporary fix! The duct tape was just too flat to puff out using stuffing alone.

To make a fast, pinnable cover, I took a large men’s crew neck t-shirt and placed it, inside out, over my double. I pinned down the sides, slipped it off, and sewed each side, turned it right side out, and slipped it over the form. Voila! Many people have noted that it’s possible to pin into the duct tape, but it does make the pins gummy, and I suspect it would limit the life of the dummy. I love the thin cotton cover — it’s pinnable, washable, and easily replaced.

I will want to make a permanent base for underside of the next dummy, though, to give it a little more stability in the hip area. I haven’t decided yet whether I want to cut the base from a light plywood, or try to find a sturdy plastic for the job. In the meantime, the cover is pinned under, basically onto the open stuffing, which keeps it all together while I work.

I was shocked by my duct tape double (am I really shaped like that?!!), but all it took was a good look in the mirror, side-by-side, to realize how accurate it is. Mental note: time for some abdominal exercises! Somehow, the duct tape even captured my posture, and a little bit of asymmetry I’d never noticed. The good news is, of course, that alterations are now faster and more accurate. Hurrah!

Posted in Tools | 2 Comments

Vogue 8335 – Wrap Tunic

I love leggings, but I’m not 20 anymore, so I prefer long tunics over them. This one looked like a good bet, so I whipped up a muslin in a cotton knit.

For the first time ever, I attempted a full bust adjustment, using these instructions. I’m borderline in that department, and usually don’t need one. But it looked like a good idea here. Too late, I realized that this mock-wrap calls for an adjustment on both sides, since (ahem) that’s where my breasts are. I should have checked out The Sewing Divas’ advice, but apparently I was feeling geometrically challenged today, and didn’t quite get there.

Nonetheless, I did get a pretty good result:

Except. Except for that hem — what’s the deal with that hem? In order to ensure that I didn’t mess it up, I followed Sandra Betzina’s instructions and used Steam A Seam 2 to ensure (ha!) an unstretched hem. I even hedged my bet by cutting the SAS2 to size based on the pattern, not the garment. No dice:

Am I just terminally hem challenged, or what?

The bust part looks just fine, in spite of the fact that I really did do it all wrong:

And isn’t it cool, the way the stitching disguises the center back seam? And also keeps the untrimmed seam allowances flat?

OK, so this was a muslin. I’ll wear it around the house. But what on earth do I do to get those hems to work? Google, here I come. Again.

Update: After I posted my review of a previous top on PR, sewing for fun added a helpful suggestion there. She suggested using Design Plus Ultra-Soft Double sided fusible web from LJ Designs. I’m going to try it for the next shirt, but I’d already made this one.

Posted in Tops | 3 Comments

Here Be Katzen

Yeah, more cats.

The sewing room was meant to be Emma’s, since this unholy duo chase her all over the rest of the house. Somehow, though, Emma’s shelf gets co-opted now and then by Sally and Alex. There’s obviously no good reason to leave all the sewing room shedding to Emma.

These guys are Cat Angel Network rescue babies, too, but a little bolder than Emma. (And they’re siblings, too, so they’re a pack of 2 instead of a solo cat. Strength in numbers, yah!)

Posted in Home | Leave a comment

PacSafe CitySafe 200 Review and Mod

Years ago, when I was living in Cuernavaca, I modified my backpack by putting metal screening across the bottom and sides to make it slash proof. When I was robbed, the thieves were only able to open my decoy pocket. What did they get? A banana and three tortillas, wrapped in a brightly colored handkerchief. (I’d have loved to have seen their faces when they opened the loot!)

So one of my avocations is the never-ending search for perfect travel bags, and I’ve been interested in ‘secure’ travel bags for a long time. I buy them, I make them, I search them out wherever I go, always eager to discover the next cool or useful feature.

This CitySafe bag has been on my acquisition list for over a year, but I wasn’t able to find the version I wanted in black. For my last trip, I made my Diva bag, and used it, but eventually decided that I really wanted the CitySafe, too, and I ordered it from REI.

Well, not precisely the bag you see above; that’s what I theoretically ordered. I bought mine in nondescript black, but it also comes in an attractive dark brown, tan, and the red above, which is actually more wine colored than bright red. But REI didn’t send me this exact bag — they sent the newer type, which doesn’t have that zipper you see on the left. The difference matters, as you’ll see below.

This CitySafe 200 comes with a slash-proof “exomesh” lining, and slash-proof straps. There are also clever ways to secure your main zipper, and to secure your bag around a bench, train seat (if you have bars underneath), chair, etc. Not so much an issue in this country, maybe, but pretty handy in quite a few other areas of the world, as noted above.

It’s almost perfect. But there are some issues, not relating to security, but to practicality. First of all, as mentioned, the new version doesn’t have that zipper you see above on the side of the water bottle pocket. The zipper pocket was barely adequate when it came to carrying a slim water bottle, but at least you could stuff one in if you had to.

It’s been replaced in the new version of the bag with a gusset — hidden elastic and netting (on the left in the photo above). The new pocket is completely useless — NONE of my vast collection of water bottles or super-slim, compact thermos units fit easily (or at all) into this travesty of a pocket.

So I modified it. I reached inside of the outer fabric flap (next to the front of the bag) and carefully cut the elastic and mesh along the seam line. (I put a safety pin at the end of the elastic first; if it had been in a casing, I didn’t want to have to re-thread it.) Here’s how it looked once I cut it open (the light color is the lining, folded over):

Then I whip-stitched the edges of the mesh and the elastic, and encased them in grosgrain ribbon, making sure to stitch the mesh in place at least three times. Hiding my stitches as carefully as possible, I stitched the grosgrain edge into the flap, hiding the edge inside. The result? A pocket large enough for a standard slim Nalgene:

Unfortunately, it’s not as deep as it should be (that’s a child’s Nalgene above). The last inch and a half of the pocket is useless because, instead of taking the gusset all the way to the bottom, PacSafe just pleated it closed. None the less, with my modification, at least the pocket’s now usable.

When I carry a tall Nalgene, I also clip a carabiner through the cap, just to make sure that I don’t lose the bottle if it pops out of the too-shallow pocket:

I also added a flat button and elastic loop to keep the gusset neatly closed when not carrying a water bottle:

(Great button, isn’t it? It’s exactly the size and shape of an M & M candy. I used it for the feet on my Diva bag, too, and I wish I could find more of them.)

Next up were the two flat pockets on the back side of the bag, closed with zippers. Very flat pockets — in fact, very flat, small, useless pockets. (I was alerted to these by reviewers on REI.com, as well as to the solution to the problem.)

Carefully removing the stitching that divides these pockets reveals one long, large pocket — perfect for maps, tickets, smaller guidebooks, etc.. Keeping any of those in your new pocket won’t require opening the main section of the bag, which is exactly what you’d have to do if you left these pockets small.

Happily the ‘two’ zippers aren’t two at all — once the midline stitching is gone, you’ve got two zipper heads on one long zipper — perfect! And you can even use a small padlock or cable to ‘lock’ them closed, if you wish.

Inside, this bag has lots of (mostly) well-designed interior pockets. A small pocket on one end is perfect for my chopsticks, and two sleeves on the other end hold pens. Along the side, though, is a whole section for credit cards. Really? Credit cards? Out in the open like that? Who even thinks of doing that anymore? I wanted (and needed) another pocket for my gear, so I sewed one up, and hand-tacked it in place:

That’s it on the left. On the outside, I put a smaller pocket for lip balm and my mini-flashlight. Can’t live without either. Looking at it now, I wish I’d made a box pocket, just like the ones PacSafe provided. (Maybe I’ll get ambitious and replace it one of these days.) That’s another really nice thing about this bag — it’s really beautifully made, inside and out. So many things are sewn sloppily these days — but not this bag!

There’s a smaller zipped interior pocket (inside out, above) that’s perfect for a wallet (that thing you actually use for your cards and small ID), a passport, and even a small notebook. A large, almost hidden, pocket lies behind the interior pockets, also with a zipper closure.

What else might I want to change? This bag doesn’t make into a backpack. However, the strap is highly adjustable, and the bag is flat and easy to wear — and worry-free, even in a large crowd, or mashed up against hundreds of humans in a subway. The strap adjusts small enough that I can carry it on my shoulder like a purse; it’s long enough so that the bag can be slung, quite low, across my body, too.

So I’m sold, but hey, PacSafe, people have been complaining about these things I had to mod for quite a while — how about addressing them? You’ve got a great bag here — I made mine fabulous! How about you doing the same?? I might even buy another one, next time in dark taupe (or what I’d call brown).

Note: REI shows the zipper bag on their website, but will send you the gusset version, which is also what’s now stocked in their stores. At least in their stores in the three states that I personally checked. Harrumph.

By the way, this bag also comes in a smaller, purse-sized, version — the CitySafe100. If you travel lighter than I do, it’s pretty neat. Of course, you’ll lose about 1/3 of the space of the 200, and as for the water bottle? No way!

Posted in Bags | 4 Comments

Vogue 8323 – Scoop-Neck Top

I’d made the cowl version of this shirt previously and really liked it. Opportunities to wear it aren’t frequent, though, since the cowl is really exaggerated — fun, but not too practical for every day. I love the lines of this shirt, though, so I decided to make the scoop neck version.

Putting this one together couldn’t be simpler (or faster!). It’s got princess seams front and back, sleeves, and that’s about it. And a nice, trim look when you’re done:

My hem doesn’t look all that great though. I used an adhesive, iron-on tape to support it and keep it from stretching, but the results aren’t exactly what I want (though the look did improve with washing — after this photo was taken — for unknown reasons).

Love those lines! This is one of those maligned, widely-available cotton knits (I’ve got a lot in my stash for some reason), but they sew up beautifully — except for that hem problem. I need to do more work on this.

I’m getting very fond of this particular utility stitch on my Pfaff. I love the way it finishes the seams, and keeps them smooth — much nicer than the little ridge trimming the seam leaves:

Vogue has you finish the neck using bias tape, trimming the seam allowance, and turning the tape to the inside. Instead, I finished the neckline using a self-fabric band, turning it once over the seam allowance, and then “stitching in the ditch”. It worked really well, and gave a clean, neat look to the neckline:

That made my neckline 5/8ths of an inch higher than Vogue’s, of course, but it’s just right on me.

This top is a great alternative to the sloppy tee we’re all tempted to wear around the house. It’s super comfortable, easy to wear and care for, and so good looking! Even better, it whips up in no time at all. I’m sure I’ll be making more of these.

Posted in Tips, Tops | 7 Comments