
I made felt slippers! Several pair in gray, and these in red:
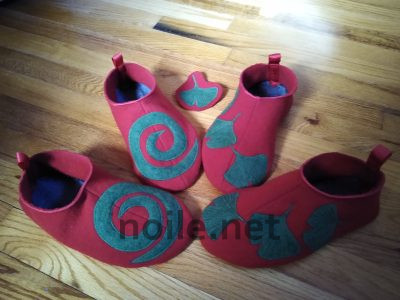
Image of a pair of red felt slippers with
green felt swirls, and a pair of red felt slippers
with three ginkgo leaves on each.
Between is a practice ginkgo leaf appliqué.
We have wooden floors, and don´t wear shoes in the house. Most slippers generally seem like too much to wear, yet the feet need something to keep them clean and comfortable. And warm, in the cooler months. Wool felt seemed like a good answer.
I didn´t want to draft a pattern myself, and a seemingly promising one from Etsy turned out to be the worst sort of amateur disaster. Eventually I stumbled on Martha Stewart´s felt slipper pattern, and was off and running. You´ll have to search for the template; at least as of the time of this post, there´s no link to the .pdf on the Stewart page linked above.
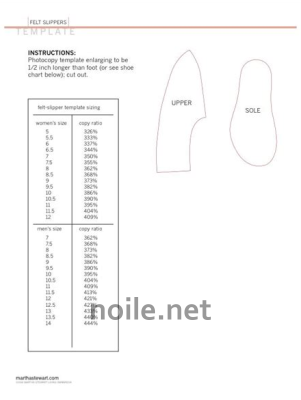
Image of the Martha Stewart slipper pattern download.
Stewart´s pattern has a nice curve to the top; just enough to distinguish it from most slipper drafts. Instead of grading on the pattern itself, Stewart provides a table with the enlargement percentage required for each size. We´re fortunate enough to have a copier that allows us to do this ourselves, with a little fiddling, but most people will be best off taking the instructions to a copy shop and letting them create the pattern.
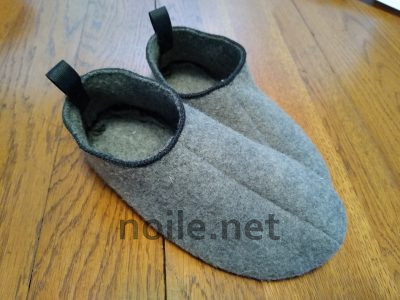
Image of my first pair of gray felt slippers with added black
cord along upper edge and a black grosgrain pull tab in back.
Stewart´s slippers make up very quickly, but left a lot to be desired if they were meant to be everyday wear, so I changed up a few things. I first made up a toile pair, using the Martha Stewart pattern as given, with just a few simple changes (noted below).
1. Using my toile pair, I created an instep which made the fit better, and the slippers less floppy. This meant altering both the insole side of the pattern, and the sole piece.
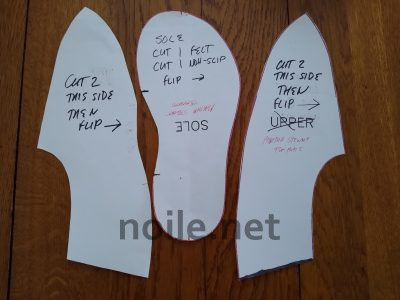
Image showing my re-drawn pattern pieces,
with instep and sole altered to give a custom fit.
See the dark marks on the sole instep? You can´t quite see them here, but there are matching ones on the upper instep. They are very important, as are the marks on the sole showing where the center front and heel seems line up! (All four markings are absent from the MS slipper pattern.) If these marks aren´t done correctly, your slippers are likely to twist and never fit correctly.
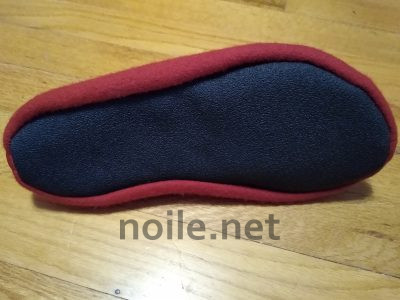
Image of a black non-slip sole on the
underside of a red felt slipper.
2. Although I used a felt insole, I also added a no-slip sole to the bottom of the slippers. (See wood floors, above!) This has the advantage of being wipeable, so that the soles can be kept clean without having constantly to wash the slippers themselves.
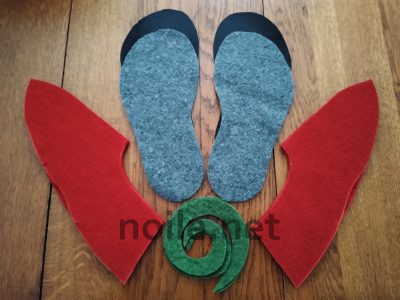
Image showing cut-out parts of a pair of red felt slippers.
The slipper uppers are to the right and left,
and gray felt soles are laid over black non-slip soles
between. Below is a green felt swirl, prepared for appliquéing.
3. But I kept a felt insole, for a bit of cushioning, and so that the inner slipper was soft, not vinyl.
4. Stewart´s slippers call for a 3/16ths of an inch seam allowance. (So did the Etsy pattern.) Uh, what? I reduced mine to 1/4 inch. And I printed the slipper pattern one size up, since I always wear my felt slippers with thin socks — a liner which keeps the slippers fresh, and my feet comfortable, and that worked perfectly for me. (I´m not sensitive to wool, but this is good trick for those who love wool slippers but find wool next to skin irritating.)

Image of a gray felt inner sole clipped to the
upper body of a red felt slipper, ready for stitching.
Using a dedicated 1/4 inch foot made construction fast and easy, but any conventional (USA) sewing foot will make quarter inch seams simple. Not so much for 3/16ths of an inch seams. (On the other hand, a quarter-inch seam does demand great accuracy when stitching, so keep that in mind.)
5. The MS slippers are sewn wrong side together, with the seam allowances showing on the outside of the slipper. I sewed mine conventionally, with the seam allowances inside the slipper, for a more finished look.
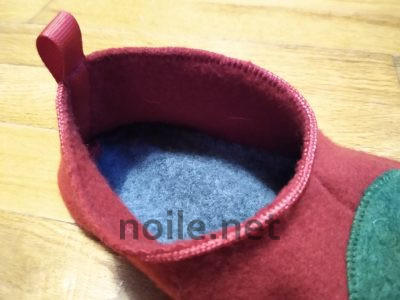
Image of the ankle of a red felt slipper with cording
zig-zagged onto the upper edge. A corner of a green
appliquéd spiral is just visible at the lower right.
6. I added a braided cord along the top edge, since unsupported felt at the top of the foot was likely to stretch out of shape in use. I used a couching/braid foot to add the cord, which made it fast and easy, but this can be done with conventional feet, too. I did this before sewing the heel seam, which is both much easier, and also lets me tuck the ends in when the seam is done.
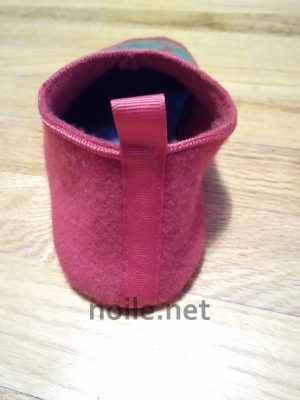
Image of the heel of a red felt slipper with
a red grosgrain ribbon tab at the back.
7. At the heel, I added a trim band with a loop for ease in donning the slippers. I used doubled grosgrain ribbon, and sewed the edges together before attaching it to the slipper. This heel tab, too, saves wear and tear on the felt by supporting it in a vulnerable area.
It also hides the ends of the cord, and let me put the heel seam allowances on the outer side of the slipper, since it´s hidden by the trim. That makes for a smooth heel inside the slipper. (This means, of course, that I am sewing the heel seam with wrong sides together, so that there is a seam, not the seam allowance, inside the slipper, unlike the upper front seams, which I sewed conventionally.)
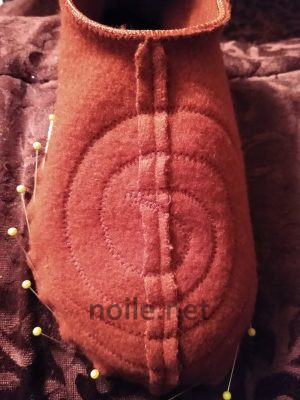
Image of inside of slipper with seam allowances tacked down, and outline
of appliqué stitching visible. Pins are visible along the sole
of the partially-assembled slipper.
8. Tiny felt seams are bulky, so I hand-stitched the upper seam allowances down. This only takes a minute, but helps keep the body shape, and is invaluable if you plan to appliqué the top. Naturally, I added all the appliqués after sewing the upper front seams, but before sewing the heels, and before assembling the slippers.
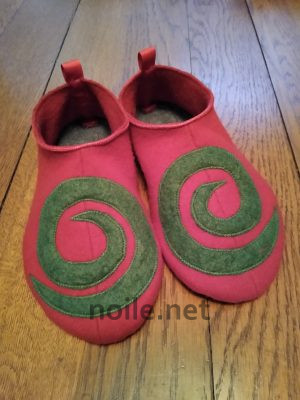
Image of a pair of red felt slippers with
large green felt appliqués applied to the toes.
I hand-drew a swirl pattern for the first pair, and appliquéd the spirals before attaching the sole. A felt swirl can prove pretty shifty — felt loves to conform to whatever pressures are exerted upon it — but careful pinning (basting would work, too) ensured that the swirl kept its shape. Take care to respect the shape of the slipper top when adding your designs!
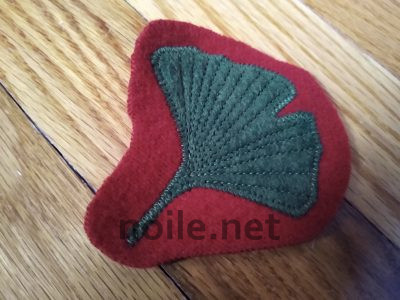
Image of a practice piece of appliquéd
ginkgo leaf in green felt sewn onto a piece of red felt.
The ginkgo appliqué seemed more daunting, so I practiced first, and was pretty pleased with the result. Ginkgo leaves have parallel veins, which made them ideal for this kind of free-hand quilting.
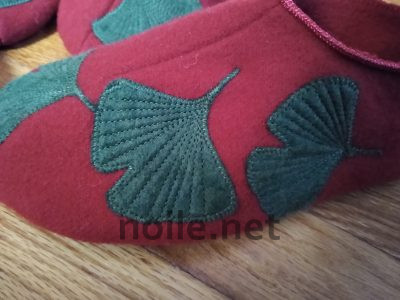
Image of the side of a red felt slipper with three
ginkgo leaves in green felt appliquéd on the front.
Most people won´t find this necessary, but I also angled the heel seam, slightly narrowing it at the top. This fits my own feet better, and also contributes to keeping the slipper in place on my foot. I have small feet, broad at the toe, but very narrow at the heel, so this was a perfect alteration for me.
Because I was making multiple pairs, I used Norpro Cut N Slice flexible cutting boards to make plastic templates of the pattern pieces. When using felt, I draw around the pattern instead of using weights or pins; it´s more accurate. A more-or-less transparent pattern also allows for good design placement, if you´re using a pattern for your slippers instead of plain fabric, or an appliqué.
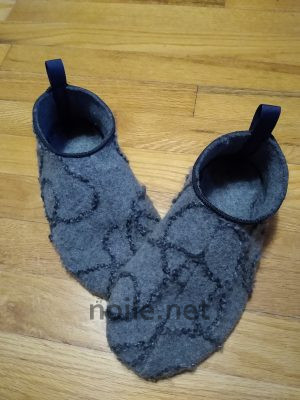
Image of two grey felt slippers with a thick soft
variegated gray twisted yarn couched in a
random pattern across the fabric.
Using a transparent template avoids the issue I had with this second pair of slippers: I couched yarn onto the gray felt, and then cut the slippers out using my original paper pattern — and didn´t notice the open patch on the right foot near the arch! (Also, don´t use fuzzy yarn for your couching! It makes for a great pair of dust mops, but next time I´ll use a yarn with a harder finish, or an actual cord.)
Materials Notes:
The gray slippers were made from a washable wool felt bought at a brick and mortar store (not online). The felt was machine washed and fluffed in the dryer, carefully. The red slippers are made from a woven wool, from the same source, which was likewise washed in a machine and machine-dried, which felted and fluffed it very nicely.
The green felt was an expensive (!) piece bought as an experiment from JoAnn Fabrics. In spite of the cost, it´s poor quality, and requires dry cleaning (!). However, I also washed this felt — which revealed all the patchy spots where it was badly manufactured — and was able to use it as I planned, in these slippers, which will be hand-washed from now on.