
After two disappointing bag projects (not yet blogged), I looked for something more likely to succeed, and found Noodlehead´s Haralson pattern. Noodlehead projects are a favorite of a good friend, so I thought the belt bag would be a good bet — and a useful bag for the summer.

Photo of a small tapestry bag in shades of tan,
gold, brown, dark brown and blues, with brown
webbing and dark brass hardware, and a wide
dark brown webbing strap.
I have a couple of quibbles about the pattern, but over all I´m quite happy with the result.
The instructions provided with the paper pattern are generally super-clear, precise and helpful, but I´m always annoyed when I buy a printed pattern and discover that I´m expected to draft a few pieces myself — and even more annoyed when the provided pieces aren´t complete. Noodlehead shows flat cutting layouts for this bag, but most (all?) pattern pieces are only half pieces.
So not only was I stuck with drafting a couple of pieces, but I needed to complete the ones that were provided. I don´t know about anyone else, but one of the best ways I can fail when drafting a pattern is to take one half of a piece and attempt to flip it to cut the exact same other side all-in-one — somehow I never get it right. So off the bat, I had to trace every pattern piece, supplying the missing other halves, and the missing rectangular pieces which also weren´t included.
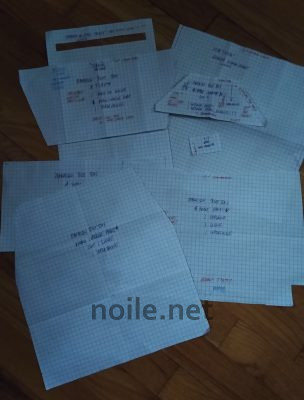
Photo of all the Haralson pattern pieces drawn onto graph
paper which I had to draft myself because only incomplete
pieces (and sometimes none) were included in the printed pattern.
Seriously?!?
This is not why I buy a paper pattern! It was not a good start, and meant that I couldn´t just jump right in and make my bag. The pattern itself is beautifully drafted, which I truly appreciated, but this was a serious fail, in my eyes.
I like the design very much — the flap has a bit of character, and the front panel has a lovely curve. With one exception, the instructions are very clear — really among the best I´ve ever seen! — and intermediate sewists should find making this bag smooth sailing.
The carefully detailed lists of fabric/interfacing/webbing, etc. are very helpful (and precise), and there are even labels provided to ensure that no one forgets which piece is being worked on. A lot of careful thought has gone into this pattern, and it shows! Apart from my annoyance with the printed pattern, I wholeheartedly recommend it.
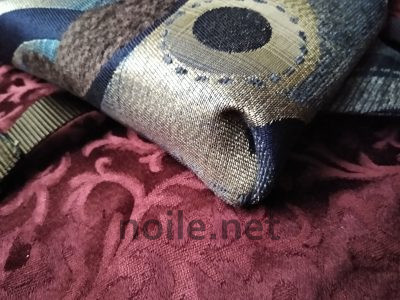
Photo of a corner pleat on a Haralson bag. If this bag had been
made with a more supple interfacing, the pleat would extend
diagonally across the front of the bag. In this case the fold
stops at the corner of the heavily interfaced tapestry bag.
The one area where the instructions do fail, in my opinion, is in describing the pleat at the front corners. I felt that the illustration made it far more confusing that it should have been, but was able to figure it out once I had the front assembled and could manipulate the fabric myself. I would suggest, though, that anyone attempting this step actually sew the folded pleats together before layering them onto the side seams. That should save a lot of grief when doing the last bit of sewing.
In terms of function, though, those pleats make the bag! They turn what would otherwise have been a perfectly fine flat bag into one that has room to carry basic everyday things — and even a small book or e-reader — with ease. It´s my dream, realized!
That covered, I made a lot of changes to suit my particular needs.
Firstly, I made things a bit difficult for myself by deciding that I want the flap to be lined with the exterior fabric. Since I didn´t want to draft separate pieces for the supplied back lining, I cut out the lining as given, and attached the tapestry lining piece to the thin poly lining, covering the join with grosgrain ribbon.
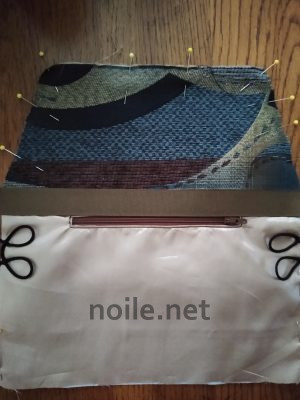
Photo of a basted back panel for the Haralson bag with a tapestry
flap lining, dark gold satin lining, a zipper in the middle,
and brown grosgrain ribbon covering the join between the
tapestry flap and the bag´s lower lining. There are two thin, black,
cord loops on each side of the lower bag which will be used for
attaching small things securely in this open-topped bag.
That all fit perfectly just above the internal back zip pocket. I added thin cord loops on each side of the interior so that I could clip keys, small pouches, or whatever in side the bag. Peculiarly, the Haralson is described as a ´security´ bag, which is a strange way to refer to an open-topped bag; any small, unsecured thing is likely to fall right out unless strapped in. The back pocket zipper pocket is good-sized, but the interior zip pocket is extremely small. I´m not sure what I will carry in it. A train pass?
Because I do like exterior zip pockets, but don´t like zipper pulls rubbing against my clothing, or catching in knits, I added a zipper ´garage´ so that the pull tab can be tucked under fabric. In the tapestry I chose, this was a messy business, and it´s a bit bulky, but it does the trick.
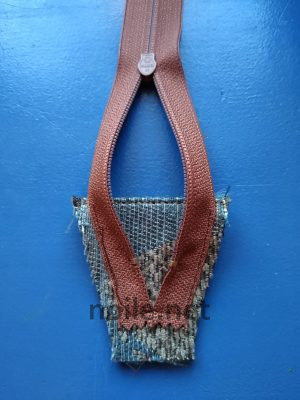
Photo of the reverside of an open brown zipper
basted to a triangular tapestry tab.
Noodlehead provides pattern pieces for end tabs for that exterior zipper. Oddly, this is the one piece that is probably better cut on the fold — her instructions call for seaming the tabs before applying them. Instead, I did cut them on the fold to avoid the bulk of a seam, and the extra sewing step. Seaming them would have been especially bulky in my tapestry fabric.
For the ´garage´, though, I started with the original tab, and then angled it out so that it would form a hood over the zipper pull. Then I basted it in place as shown in the photo above. When the zipper is closed, the extra fabric curves over the pull, as shown below.
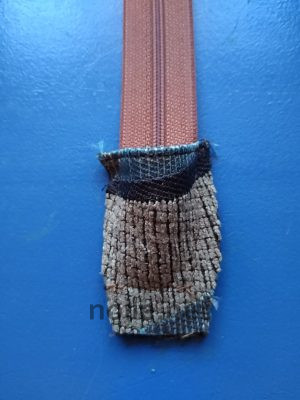
Photo of a brown zipper with a tapestry
hood partially basted over the zipper pull.
I added pockets to the interior front because I knew I´d want to carry a clip-in pen and a small notebook there, and so I have a pocket to put my keys into so that they don´t ding up the lining or whatever else is in my bag — like my phone. (My keys are clipped in, so the open top isn´t an issue.)
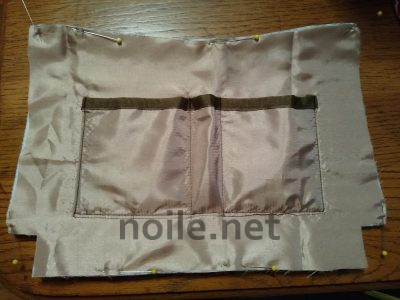
Photo of the lower front lining on the Haralson bag
with pockets made of dark gold satin lining and reinforced
at the top with folded brown grosgrain ribbon.
I didn´t want the stitching to show on the front, so I sewed the pockets to the lining and interfacing. I reinforced the top edge with folded-over grosgrain ribbon; the edges of pockets like these always get a lot of wear.
Incidentally, I love Tom Bihn´s key straps and organizer pouches. I use them in his bags, but also everywhere else I can — they´re incredibly useful. Mine clip into thin loops sewn into the side seams of this bag.
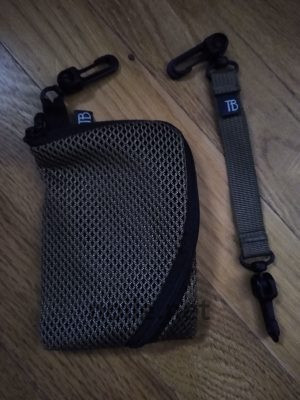
Photo of a coyote (medium brown) Tom Bihn key strap and a
Tom Bihn mesh coyote Ghost Whale organizer pouch.
The interfacing I used is extremely thick and stiff; this was deliberate, as I wanted a bag that would keep its shape and be somewhat protective of the contents. That presented some challenges, of course, particularly when turning the bag right side out! It also changed the profile of my Haralson a bit — you can see that the flap curves over the lower bag, instead of lying flat, and the whole bag is very rounded instead of being closer to a flat clutch.
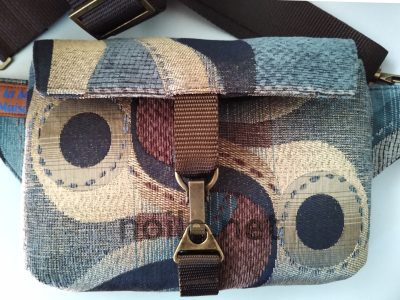
Photo of the finished and closed Haralson tapestry
bag showing front webbing and dark brass hardware.
I don´t like the look of the riveted leather fasteners that I see on most of the Haralsons sold on Etsy, so I used webbing and an interesting brass fastener I bought years ago in New York. The upper fastener´s webbing is actually secured to the underside of the flap lining, where the stitching isn´t at all obvious, and the webbing was inserted between the outer flap and the lining piece before I stitched up the opening through which the bag was turned when finished.
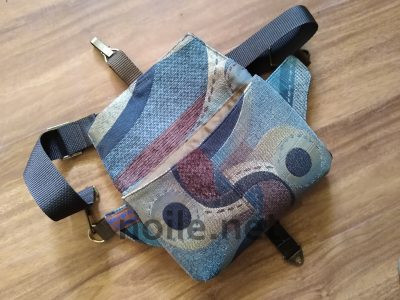
Photo of the finished Haralson bag, open, with the lined upper
flap and grosgrain trim showing, as well as the underside
of the closure attachment showing where the secure
stitching was made inside the upper bag flap.
This bag was made entirely from stash, and I compromised in ways I never would have in the past. This was painful! Using a multicolored tapestry fabric made this feasible without too much lost, but my one-inch webbing and my wider shoulder strap are not exactly the same brown, and the D-rings aren´t exactly the same burnished bronze as the rest of the hardware.
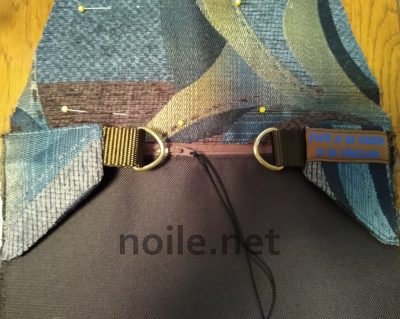
Photo of the back of the unassembled Haralson bag showing
the side flaps and D-rings, as well as the brown Cordura back
panel and the zipper with thread pull. The thread pull is very
long here; it was shortened once the bag was finished.
Because I didn´t have enough of my tapestry remnant to make the whole bag, I used dark brown Cordura for the back. (That´s actually a good thing, if unusual, since my tapestry is not very abrasion-resistant, and Cordura is!) Two shades of brown thread were used to sew the bag, and I didn´t switch thread to match the lining on the inside, all for the sake of knocking off stash! I don´t like that much, but, let´s face it, the stash has to go . . .
Disclosure: I don´t have any affiliation, financial or otherwise, either with Noodlehead Sewing Patterns or Tom Bihn, and all materials were paid for by me.
I love all the mods and tips you had for sewing this pattern. Thank you! I’m going to bookmark it so when I do sew it myself, I can reacquaint myself.
I love the loops you sewed in and the plumbing rings you used for your phone holder could be used like in the T Bihn bags. I’ve wondered where I could source that particular notion and now I know-yay!
I´m so glad this post was helpful, Rachael! Yes, I´ve actually sometimes used the plumbing rings for loops in bags. Since they´re sewn in, though, I usually use two at once in case one were to break, and use them bdoubled when I clip things in. (It´s never happened, but if one did break, I´d have the second ring as back-up). I trust Bihn´s rings a bit more, but haven´t yet figured out where to find them — T Bihn still has some secrets, it seems!