
(Note: Thanks to the excellent influence of Jorts the Cat, my images will now show descriptions beneath. WordPress doesn´t support ALT tags for users with limited vision, so this is how I´ĺl accommodate.)
When I first saw the L´Hood Ritza hat, I swooned. It was bonkers in all the ways I love most: wide-brimmed, cape-backed, and had a weird engineering twist.
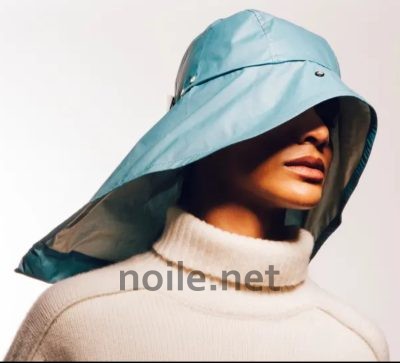
Image of an over-sized blue Ritza L´Hood storm hat with a
very large brim covering the eyes and upper shoulders of a model.
That twist was a wrap band that allowed the cape-like hat to become a smaller hood.
But . . . the Ritza was perpetually out of stock in my size, even though I waited for months. Naturally, I decided to try to make my own.
And I pretty much succeeded!
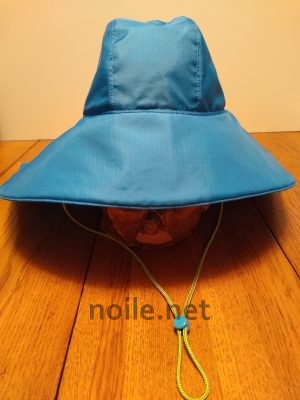
Image of a blue broad brimmed hat, shown from the front.
It is sitting on a clay pot with an abstract face image.
A lime green chin strap is in front, with a small turquoise button toggle.
It´s got all the swoop and presence anyone could wish for — or maybe more, since some spatial awareness turns out to be useful when navigating smaller spaces with that back brim.
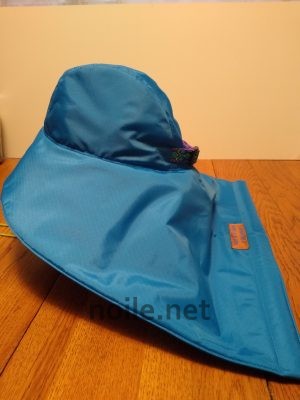
Side view image of a blue hat with an enormous sweeping brim.
But it´s pretty glorious, if I do say so myself!
I began with Green Pepper´s Norwester Hat, which I´d made once before.
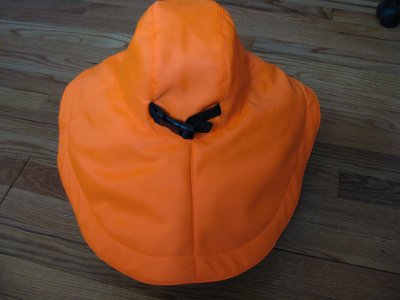
Image of an orange Green Pepper Norwester hat with black webbing
and a black buckle at the back.
I couldn´t find the pattern I´d used previously, and JoAnn doesn´t seem to stock Green Pepper patterns any longer (a real loss!), so I ordered another copy. This was apparently new old stock, since it was in the original giant format, but no matter, it was exactly what I needed. (It seems to be identical to the F847 I used previously.)
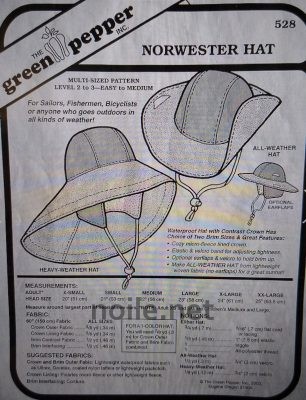
Image of Green Pepper Norwester Hat
pattern Number 528, showing illustration
of hat variations and listing pattern information.
Since I knew I liked the fit, the only change I made to the pattern itself was to the brim, which I shaped to be rectangular in back. I found the blue ripstop at JoAnn, and discovered that, though it was lighter-weight than I wanted, it was also much better quality than other ripstops I´d purchased there — the final treatment was on-grain, not wonky as usual. And I love the color!
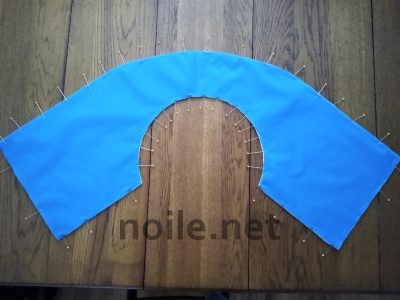
Image of an unsewn brim pattern cut in blue ripstop. The
pattern looks like a standard hat brim in front, but has
squared-off ends where the back will be, once sewn.
That gave me the Ritza shape. However, the unique feature of the genuine Ritza is the wrap band, which allows the rolled up cape to settle around the neck for a smaller profile, if that´s wanted, and also allows that cape to keep its shape.
This required what is sometimes called a ´´slap band´´. I made mine from a one-inch wide metal measuring tape, bought at Target for around $5 USD.
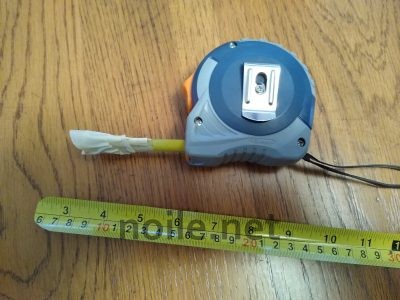
Image of a metal tape measure in a plastic case, with one end
extended. Below is a cut piece of the metal tape, with rounded ends.
I cut the tape with heavy-duty scissors, and rounded the edges. (To preserve the damaged tape measure for future use, I locked the blade in place, and also taped the end, so it wouldn´t disappear into the case.) I sized the cut piece about one inch/2.5 cm shorter than the lower edge of the modified brim. (Less seam allowances, of course!)
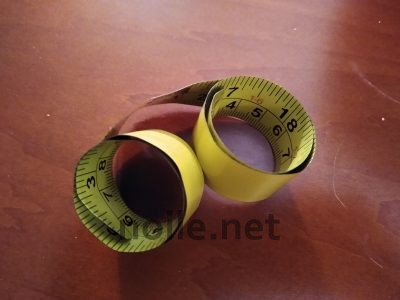
Image of the previously cut piece of yellow
metal tape, ends rolled up toward the center.
Then I rolled the band as tightly as possible, working from both ends. If you try this at home, please note that you need to wrap it as absolutely tightly, and as evenly, as you can! You want to avoid crimps — you need the smoothest roll possible — and there won´t be any spring if you don´t really tighten those circles up. (Mine were wrapped a lot tighter than the appear in the photo, where they´ve naturally unsprung a bit.)
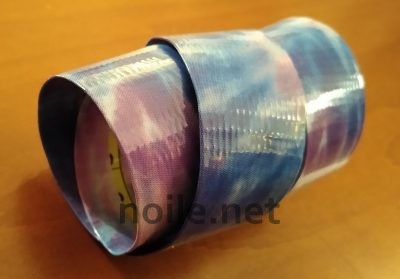
Image of the metal tape covered in watercolor
duct tape in shades of blues and berry colors.
Then I coated the band in duct tape. The metal edges were sharp on the ends, where I´d cut them, but the smoother edge of the tape measure itself would wear against fabric if it weren´t covered. I had some very compatible watercolor duct tape, so that´s what I used.
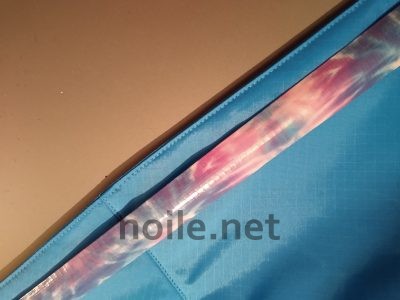
Image of the duct tape covered metal tape
resting on the outside of the stitched hat brim.
My brim is lined with the same ripstop, with a thin batt providing structure. I assembled it first, so that I could put the band in place before finishing the hat itself.

Image of a blue hat with an extended brim,
shown from the back. There is a colorful webbing
belt with a small buckle on the crown, and a maker´s
fabric label at the hem.
It looks as if Ritza just folds the brim edge up over the band, but instead, I edge-stitched the brim before attaching it to the crown, and slipped the band along the edge, inside. Then I stitched above the band to hold it in place.
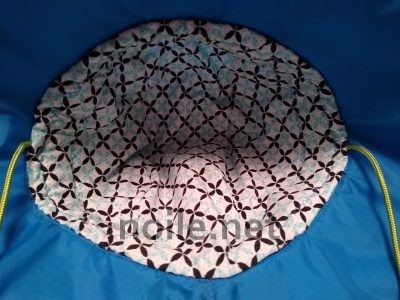
Image of the inside of the crown of a blue hat. The crown
is lined with athletic mesh printed in an angled pattern of
turquoise and black on white. A lime chin strap can be seen
on either side.
Once the brim issues were settled, I made the crown. A really thin ripstop like this one is a bit of a pain to work with, but, thanks to Green Pepper´s excellent drafting, it all worked out. I lined the crown with an athletic knit — the seller told me it was a Nike off-cut — because the solid black mesh made the crown too dark next to the brim, which is interfaced with white bat, and much more opaque. I should have used a white or beige mesh, but I was sticking to my mandate: clear out that stash!
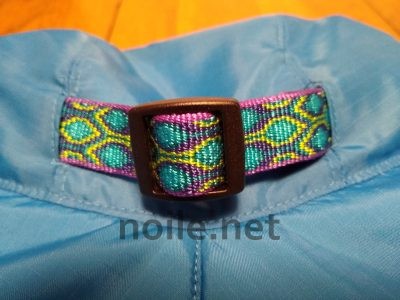
Close up image of a colorful strap and a small
black buckle fitted to the crown of a blue hat.
I reversed the slots for the webbing in the back: Green Pepper has you use elastic, and keeps it inside the hat, but I don´t like internal adjustments, and, as I did for the previous hat, I made the openings in the back of the external crown instead.
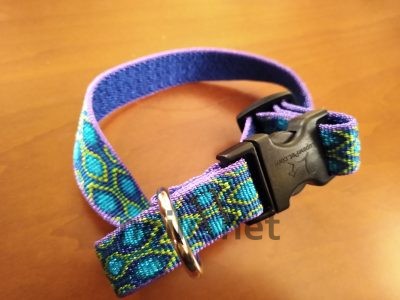
Image of a dog collar with a brass D-ring, a black buckle, and a
vibrant woven band with turquoise dot pattern outlined in lime
green and navy blue, and a thin violet border.
The webbing is from a dog collar — so much more interesting than black! (I highly recommend checking out various pet departments for cheery webbing.) I removed the buckle, and used a simpler slider (also from stash) instead, since a buckle was too bulky for my hat.
Hidden elastic is attached to the webbing, which makes for a comfortable way to adjust the size. The lime cord was also from stash, as was the matching toggle, from ancient MP3 cords I picked up in a bargain bin years ago.
Like the Ritza, my brim can be rolled and folded around to make a bonnet that is somehow at once classic and futuristic. I like to think it´s what Jane Austen would wear if she donned nylon ripstop.
Image of the previously discussed broad-brimmed
blue hat, with the large back brim rolled up and
wrapped around at the neck to form a bonnet without
a back brim.
My hat, naturally, isn´t a perfect copy of the Ritza. The brim is made differently, I used batting for shaping, the Ritza has grommets in the crown, and the Ritza also has snap fasteners, which probably make the Ritza easy to wear around a wrist (a neat feature!). But it´s very much in the spirit, and I loved making a project of Ritza´s inspiration.
If you´re more inclined to buy a Ritza, the link to home page L´Hood is here.
Your hat is awesome! I’d like one of each version!
Thanks, Barbara! (I think I need more, myself!)