
So a really talented artist in Japan has made a bunch of incredible cat backpacks. Her name is Pico Miho, also known as nekoseisaku pico, and you can see her phenomenal work here, on Bored Panda. Her cats are handcrafted, from a huge number of pattern pieces, and sell for around $1,000 USD. Also, she’s not making any at the moment.
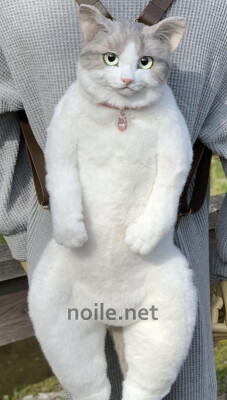
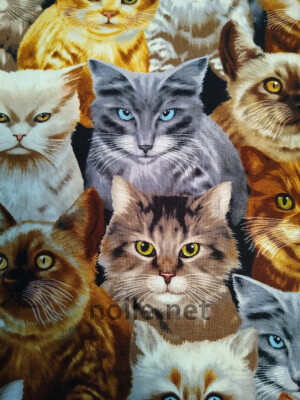
This is one of Pico Miho’s cats.
Fraudsters all over the internet will try to sell you a fake.
They will take your money and break your heart. Don’t let them do that.
Leaving aside the question of whether I am willing or able to pay $1,000 for a cat backpack — putting all my money, as it were, where my eccentricities lie — they’re not available. I went for the next best thing. Read on to meet Rufus, my Folkwear Ragdoll cat — and, now, backpack.
Let’s just admit, up front, that there is no way a cat backpack made by me, or any ordinary mortal, will resemble, even slightly, one made by Pico Miho. Nonetheless, the challenge is irresistible. Naturally, I took up the gauntlet. Of course I need a full-size cat backpack — that was obvious on first sight!
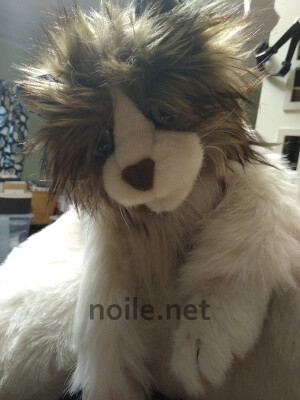
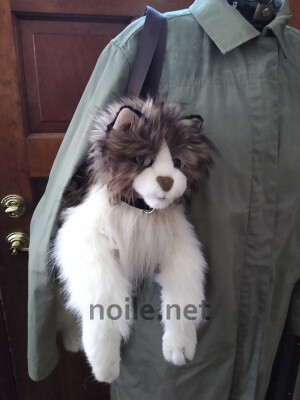
Meet Rufus. Rufus is a Folkmanis Rag Doll Cat puppet, and I’ve turned him into a backpack. Not a very practical backpack, but a backpack nonetheless. It’s been a strange trip . . . I’m a person who, in a previous life, participated in many dinner table discussions of messy [human] surgeries, and am not very bothered by bodily fluids, wounds or the like, but the night after I opened Rufus’ center back seam my dreams were of vague threats to him.
Apparently human medical issues are one thing, but Rag Doll puppet surgeries quite another. And, admittedly, the next morning, when I had to sew closed the pocket into which a human hand goes to activate Rufus as a puppet, the process felt creepy. Sigh. Nonetheless, it had to be done, or Rufus’ head would be flopping all over as he traveled the world.
 Rufus, on the surgery table.
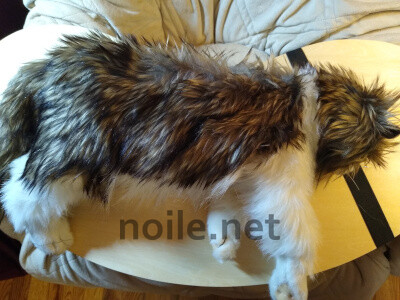
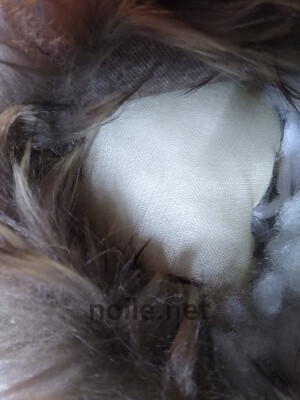
At any rate, once that center back seam was open, and Rufus’ puppet state neutralized, I removed a lot of the internal stuffing from his middle, where the backpack lining would go. At that point, I was able to get an idea of Rufus’ internal anatomy – crucial to making a pattern for his new backpack innards. I carefully saved his stuffing, which was unusual; it’s small poufs, not large chunks. This, I’m guessing, helps to create Rufus’ floppy form.
Before I could make a lining pattern, though, I had to address the issue of his remaining stuffing. I didn’t want to alter the stuffing in his arms and legs, so I had to find a way to contain it without stiffening them. Folkmanis does an extremely clever job of their puppets, which explains why they are so often incredibly life-like, but it complicated things for this transformation.
It took some care and thought, but I was able to sew light mesh netting from leg to leg, across his shoulders, and from leg to leg, across his hips. Rufus’ legs, for instance, are cut in one with his hips, which made the problem of how to secure the mesh a bit more problematic than it might otherwise have been.
I was careful to keep from compressing the stuffing, but it was important to keep it in place. The process was awkward, especially since I only anchored my stitches where Rufus already had seams — I didn’t want to interfere with his external coat by pulling at it with thread. His shoulders and hips ended up with slightly pouched areas like the one below, with the mesh gently holding his stuffing in place. That was one huge complication sorted.
The next step was to figure out where to set the clip points for the backpack harness. In order to preserve Rufus’ bodily integrity, these had to be set into seams, and the balance was important. Rufus’ limbs are always going to jut out a bit — unlike the inspiration backpack — which made the way the harness sits pretty important.
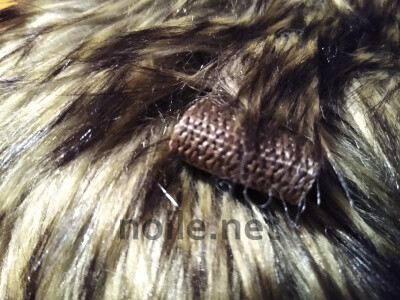
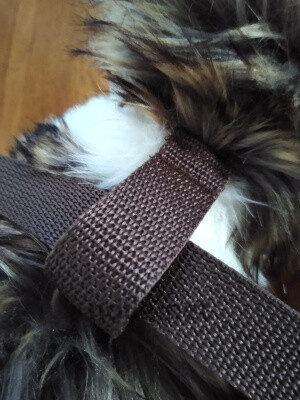
Pico Miho’s cats have beautiful metal hardware, but I wanted less weight, and I wanted Rufus to feel soft, even at the backpack strap points, when he wasn’t wearing the harness. I used webbing, doubled, to make tabs for the harness, which I set into openings at the top of his hip. It’s barely visible in his long fur, once the shoulder straps are removed.
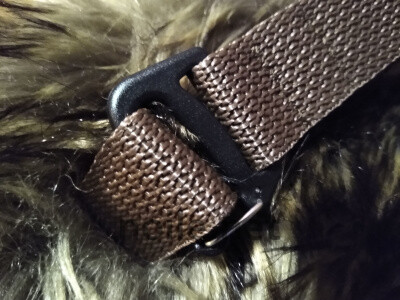
I used gatekeeper buckles on the harness; they’re flat and light, but very sturdy, and have a positive lock. And they make it possible to easily remove the straps when Rufus isn’t out-and-about, and just wants to be lounging around the house.
Once the harness tabs were in place, and Rufus’ abdominal cavity was tidied, I could move on to making a pattern. Turning Rufus inside out wasn’t practical, and measuring was difficult — though someone with a more disciplined mind than mine might do better on that front. This is what I came up with, feeling my way along:
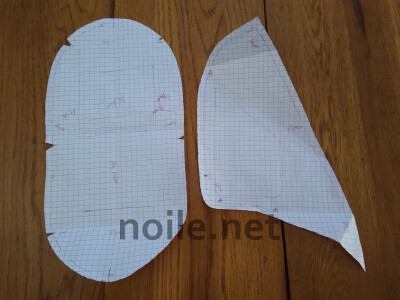
The base pattern is symmetrical, but by the time I took the picture
it had been folded a lot, and hadn’t recovered.
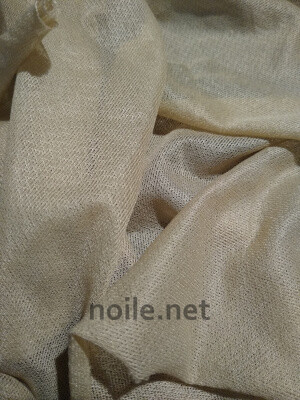
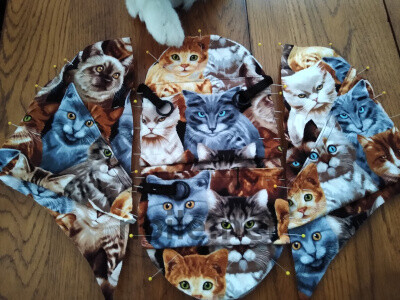
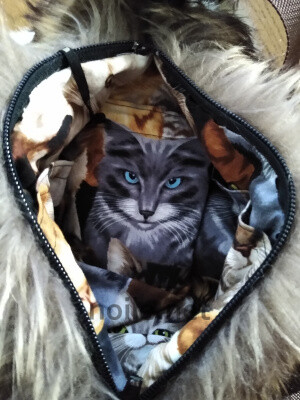
This worked, more or less — details to follow. I took a clue — I took all the clues — from Pico Miho, and found a cat-patterned cotton for the lining. I was especially taken by the gray fellow in the middle — we’re extremely fond of judgemental cats Chez Noile.
Even though I realized he’d be hard to see, I cut the lining pieces so that Mr. Judgy was featured. And then I took a step that proved utterly useless: I cut pockets to fit onto the lining. I matched the center front pocket so the Mr. Judgy was still featured, but made no attempt to do any matching on the side pieces.
 Yes, that’s Rufus’ paw up top, there.
That’s actually a fairly overwhelming clowder of cats, isn’t it? Can’t have too many, though, what?
If you look closely, you can see, at three points, where I added plumber’s O-rings. I add these, or D-rings, to every bag I own, whether I make or buy it. They let me clip anything crucial into a bag, making it easier to find the item, or ensuring that it — like keys, for instance — can’t readily fall out.
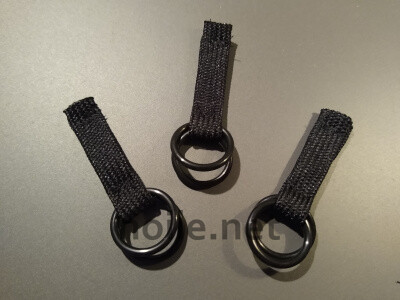 Plumber’s O-rings, attached to narrow webbing.
In addition to the cotton lining pieces, I cut the base and side pieces of a light, stiff, interfacing, and of a low-loft quilting batt. The interfacing was necessary to give support and structure to the pockets — or so I thought — and the batt was to ensure that Rufus still felt soft to the touch.
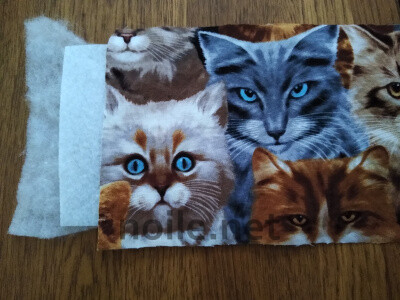
So the “sandwich” was batt, interfacing, lining, with the batt next to Rufus’ inside, and the interfacing hidden between lining and batt. Then I stitched up the whole lining, leaving the long top edge open where it would attach to the zipper. Somehow I failed to take a picture of the lining once it was 3D — possibly I was panicking a little at that point, wondering if this, uh, interesting, project would work out?
The next step was to sew a zipper all along Rufus’ open center back seam. First I anchored the seam at top and bottom, to make sure there were no unexpected openings, and then inserted the zipper, being very careful to keep Rufus’ long lovely fur completely away from the seam. This was not difficult; it just took care and attention.
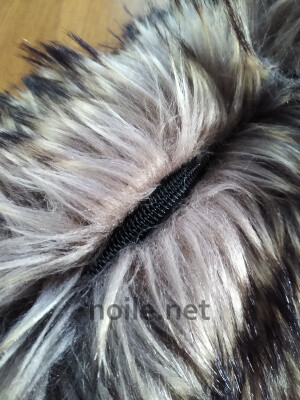
Actually using the zipper does require care — I deliberately used a big toothed zip so that fur wouldn’t catch easily, but it’s still essential to run a finger down the zipper before opening it, to keep any errand stray bits of fur out of the way. It’s a plus that Rufus’ long fur hides the zipper when it’s not in use, though!
I inserted the sewn lining into Rufus’ middle, and hand-stitched it onto the zipper — and immediately discovered that my carefully designed pockets were essentially useless. This is partly due to my failure to understand geometry, but also to my unwillingness to remove much stuffing from Rufus. Before inserting the lining, I’d added back in a bit more of Rufus’ previously removed abdominal stuffing, and that left less room than I’d intended for the lining.
The last step was to add the loop for the backpack straps. Ideally, the loop would have gone into a seam, like the lower tabs for the gatekeeper buckles, but Rufus’ neck seaming is complicated, and I didn’t want to risk altering it in unsalvageable ways. I created a loop that looks as if it were machine-sewn into place, but left an extension underneath which I hand-sewed to the back of Rufus’ neck. I used a curved upholstery needle, which let me wrap the stitches around an existing seam. That should give the loop setting the strength it needs in use. Then I stitched the side of the loop, unobtrusively, so that the extension is hidden.
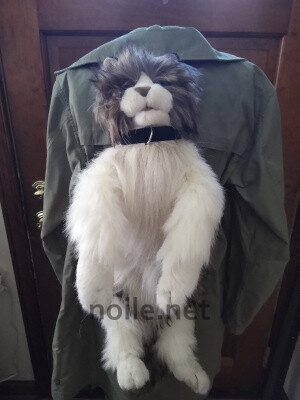
Rufus is also a fine cross-body cat.
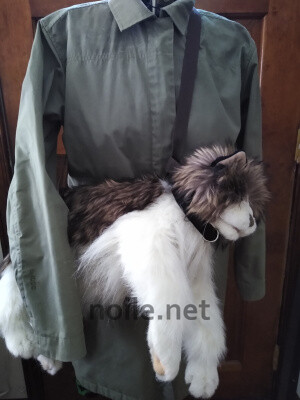
And an equally fine shoulder cat. Everything you’d wish for, in short, as a traveling companion!
Inevitably, these surgical changes changed Rufus’ nature: He’s no longer a floppy feline, but a more solid, substantial, rather large, cat. I’m less sorry about this than I might be, since carting around various wallets and other personal bits naturally changes the nature of the way he moves and is shaped. His ability to flop was always going to be circumscribed when carrying stuff; I can live with that.
So, all-in-all, this was a successful project, even if nothing like its inspiration! Though I’d probably find a better public reception for traveling with my cat backpack in Japan, I’m just eccentric enough to be thrilled, here in the USA, to be gadding about with my feline, masquerading as a sub-rosa backpack. Life is short, why not have fun?
I am amazed at all the design involved in making this one of a kind Rufus backpack from PA. You are so talented!! You did a wonderful job and I would love to see this creature in person!
Thanks, Charlotte! I suspect that Rufus will be very pleased to see you in person (as will I!) once we get this pesky pandemic under control!