
. . . that’s Draft It Yourself!
This is an easy-to-design, easy-to-make, handy, tote anyone with a little sewing experience can make.
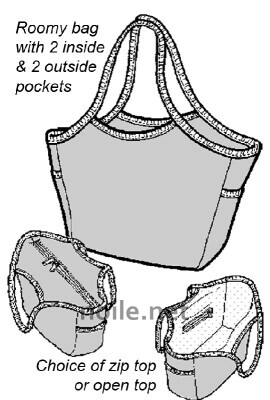
The basic design is very common — you can buy pre-made bags in this shape all over the place, but making your own is, well, a lot of fun. And if you don’t want to draft your own pattern, Green Pepper has a one that’s very similar to the one I’ve made (No. 552 Wave Bag), but with different features. Green Pepper does a great job with their patterns, so if you want a bag like this, but are leery of drafting it yourself, I’d encourage you to check theirs out.
But I’d really encourage being adventuresome here — making your own pattern for a (relatively) forgiving project like a bag is a great way to get a feel for how much you can do on your own, without a pattern!
That said, I’m afraid that I’m not going to write a tutorial. Instead, I’ll just point out how I went about making my own bag.
For my own pattern, I decided on the shape and size of the base, and measured around the seam line (not the cut edge!). Then drew one panel for the center front and back, and one panel for the sides, and then cut two pieces of each, sizing them to fit the base, and remembering seam allowances where needed.
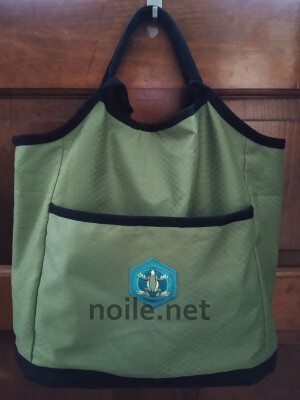
Then I cut a pocket piece for the center front, and bound the upper edge before fitting it into the seams between the center panel and the sides. I used polyester twill tape for the binding and handles.
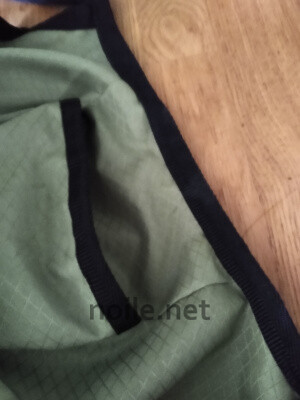 This is the top of one of the inner side pockets,
and part of the upper edge binding.
I lined the inside with self-fabric, using the same pattern pieces, and added two rectangles at either side, both bound with twill tape top and bottom. These rectangles are set into the lining side seams, and form two deep pockets for water bottles, etc.. If they’re not needed, these pockets just fit along the side since they are only panels, and don’t have a bulky bottom piece.
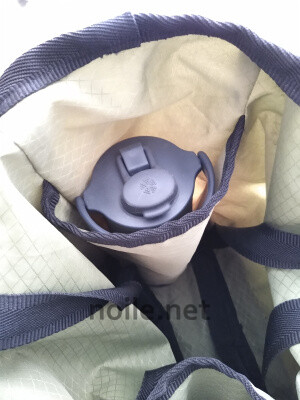 Inner pocket with tall water bottle
and other inner pocket showing on opposite side.
Once they were in place, I set the lining into the exterior of the bag, and bound the upper edge of the center panel. Then I bound the sides and shorter handles all in one along the upper edge.
Later I added extra-long straps, which are really convenient when hauling a lot of stuff, but which I actually dislike a lot as there’s no good way to store them, and they seem to be always in the way when not in use. I padded the upper edges of the both sets of handles using thin rolls of polyester batting; most people probably wouldn’t find that necessary.
 You can’t see the additional base layer clearly here;
the edging is about an inch wide.
Before putting it all together, I added an extra layer to the base of my bag in black nylon for durability, and added edging all around the lower edge of the bag itself. Adding the base makes the project a bit more complicated, and it really isn’t necessary unless you expect your bag to see particularly heavy use. The advantage of making a bag like this yourself, of course, is the ability to customize it as you prefer!
There are a lot of options to consider if you make your own, whether self-drafted or using a commercial pattern. Here’s a comparison, for example, between the Green Pepper design and mine:
- GP has two outside pockets on the sides; mine has just one center front pocket. (You could do both, or neither!)
- GP lining has a convenient inner zipper pocket; mine doesn’t, since I knew I wouldn’t put anything that needed to be secured that way into this particular bag.
- My bag has two interior slots for tall bottles, since I knew I’d want to carry those in this bag.
- GP has an optional top zipper closure; I didn’t want that for my bag, but it’s such a good idea!
- I suspect that my bag is deeper than the GP bag; I needed the depth because of the particular way I use this bag.
- The GP handles are not as short as my short ones, nor as long as my long ones. They’re probably a better choice in length than the ones I made, actually!
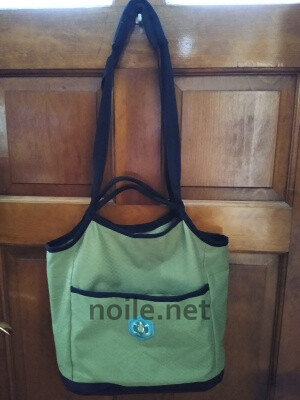
I made my bag from olive-colored shower curtain rescued from a discount bin; the base is from the black trim from the same curtain. It’s not obvious from the photos, but the texture is interesting. I never know where I’ll find inspirational fabric! The frog patch on the front pocket is from the excellent collection sold by DIY.org (scroll to the bottom of the home page and click on “Buy Skill Badges”).
I have no affiliation with either The Green Pepper pattern company or with DIY.org, except as a paying (and/or admiring) consumer.