Recently, I needed a much larger waistpack for a different kind of trip. I found this one at REI, which met the brief, except for one small problem.

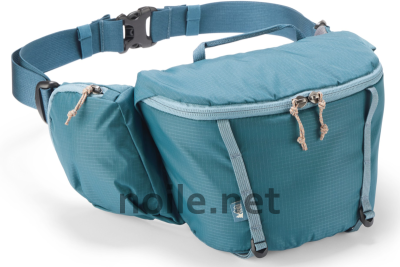
Photo of an REI Trail 5 Waistpack, courtesy REI.
The pack is a sky blue with a large zipper pocket, a waistbelt
(also sky blue) and a smaller zipped pocket visible to the left.
There is no interior zip pocket. Especially with a bigger bag, I always want a zip pocket so my wallet doesn´t tumble out when I´m not looking. Better safe than sorry is my general motto in life.
Adding a pocket to an existing, commercially-made, bag is a scary business, especially, if, as in this case, I didn´t want to add additional fabric, or a clip-in alternative. However, chopping a hole in a bag could, theoretically, ruin it forever; I was hoping to make a pocket opening between the lining and the main pack material. In this case, I consoled myself by noting that, in the case of disaster, I could handsew a grosgrain strip over the error, and go on as if I´d never made the attempt.
The first step, though, was to determine if the possibility of a pocket existed. There are interior (open) pockets in the front of this waistpack. Checking the rear, padded, pocket, revealed that no stitching from the interior pockets showed in the back. This should mean that there are two lining fabrics — one of which could be opened to create a pocket between the two.

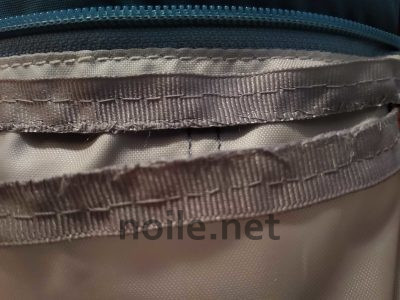
Photo of the interior of the rear padded pocket on a REI Trail 5
waistpack. The tan lining has been cut horizontally, and a
piece of matching grosgrain ribbon has similarly been cut
and the raw edges overcast together along the openings.
A second line of conventional stitching has been made
along the center line of the grosgrain ribbon, joining the
grosgrain the the waistpack lining together. When folded
inward, this will create a slot into which the zipper is inserted.
So I gathered my zipper, a strip of grosgrain for support (and to line the zipper opening), and went to work. First I marked a line where I planned to cut, which corresponded to the prospective zipper placement. Then I cut along that line, very, very carefully, ensuring that I cut only the one lining layer. I stopped short of the side seams, to leave room for the zipper ends once the insertion slot was turned.
Then I cut the one-inch grosgrain ribbon along its center, the same length as the cut in the bag. I overcast the cut edges of the ribbon and lining together, with tiny stitches. (A braver person than I would also have Fray-Checked the edges of the bag lining, but I wasn´t up for the disaster that might have become. I am relying on the edges being entirely enclosed.)
Then I hand-stitched halfway between the cut edge and the untouched edge of the grosgrain. This is the fold line which will form the opening into which the zipper is applied.

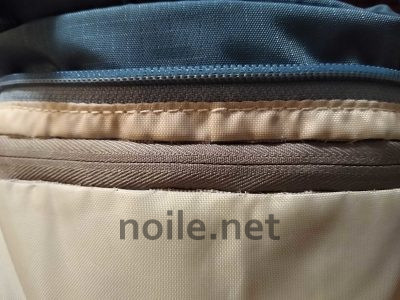
Photo showing a zipper inserted into the slot previously made.
The zipper appears to be tan, and is sewn to what appears to be
a lighter tan lining. A blue zipper, matching the exterior of the
waistpack, is visible above the newly inserted zipper. The blue
zipper closes the large padded pocket at the rear of the waistpack.
The newly-inserted zipper creates a pocket in the lining between
the two large, original, waistpack pockets.
Sadly, I have no photos of the insertion slot — the zipper opening — before I finished it. Turning and pinning it is a fiddly business, and I don´t have the photo skills required to make that comprehensible in an image.
Once the grosgrain was turned, I pinned the zipper in place, and then took very tiny, more-or-less-hidden, stitches all around the sipper tape, securing the zipper to the edge of the grosgrain and the bag lining.
(I used an invisible zipper, because I had it in stash, and because this application did not require an especially sturdy zip. A standard zip is probably preferable, but anything to reduce stash, eh?)

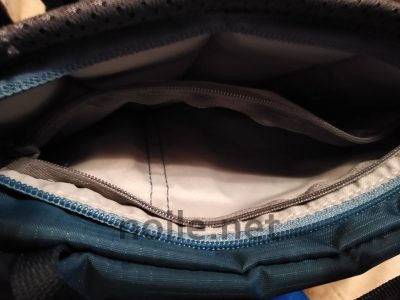
The huge padded pocket in the back of the waistpack has a
blue zipper, which you can just see the edges of, above,
and just below that, you can see the edges of my
tan zipper (which is actually gray, in real life, but hey).
Vertical stitching shows below the tan zipper; it´s the reverse
side of the open interior pockets in the main part of the bag.
End result: An interior zip pocket for better organization. It worked beautifully, and only took a few hours. I´ll be much happier with this otherwise excellent waistpack now.
I risked a modification like this one once before. It was actually a lot more fraught, at least in anticipation, since it involved messing with the exterior of a bag I like very much. You can read about it here, if you like. It was a glorious modification, as it turned out, and made that bag far more usable than it had been when purchased.
